


Welcome to the second installment of my mini-series called Organizing my Craft Room. Like I said last week, Organizing is just ONE of the Card making hobbies (the others are collecting and using/creating.
Through a series of posts, we are going to work our way around my craft space. In the interest of fairness (always full disclosure here), these are pictures I took when my craft space was all cleaned up – chances are really good that it doesn’t look like this right now. Also, I understand that everyone has different organizational spaces and needs – this is just what I’ve done with my space.
Last Monday, I shared a picture of my craft space. Here’s the wall where I keep most of my supplies:
Today, we are going to focus on two of the three small shelves on the right hand side of the wall.
You know how every clean kitchen has a “junk drawer”? And every clean house has a “junk closet”? There’s no where for me to hide my “mismatches” in this space, so the top, right shelf of my craft wall is the “junk shelf” – in plain view for everyone to see. On this shelf, I store my extended length dies and cutting pads. I also store my most-used ribbons in this ribbon storage bin I bought years ago (it takes a lot for me to just let the ribbon hang there, but it’s easiest to manage that way). I also have some twine and pierce mat up here. I’m not proud of this shelf, so take a quick peek and keep going:
I am pretty happy with the middle shelf. See how many products you can find, and then we’ll discuss.
Let’s start on the right and move to the left.
- On the far right, I store my dies and extra cutting pads. I store them on their side so that the label is visible – and, of course, they are all facing the same direction. Did you expect anything other than that?
- In the center, I store my water color crayons (love these guys). On top of the crayons, I keep a medium-sized stamp case (from one of my old wood stamp sets) filled with Stampin’ Dimensionals. Must keep those on hand and nearby. On top of that is my Color Coach. I don’t reference it very much, but it’s nice to have it nearby.
- There’s a lovely space to the left of the crayons where I keep my embossing folders – longer ones on the left and shorter ones on the right.
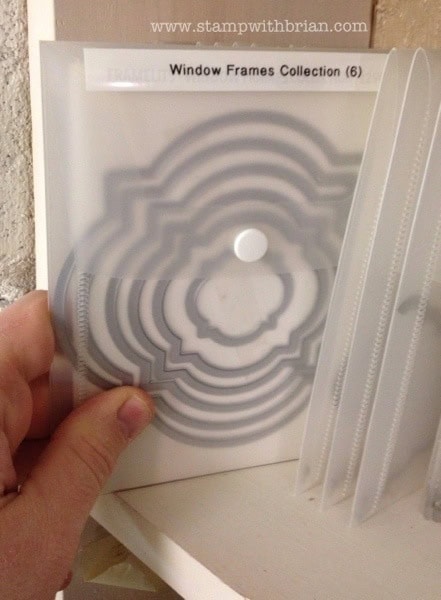
- Next comes my framelits. I’ve read a lot of discussions about ways to store the framelits. Some people store them in the DVD containers that Stampin’ Up! sells (adding magnets to the insides of the cases). Not all of the framelits fit inside the cases (some are too wide), so I keep them in their little plastic folder. I find them difficult to reference (the brown writing on the outside is not easy to see), so I added a standard, white label that includes the number of framelits I should find inside each case. This saves me a lot of frustration.
- Last, but not least, I store my paper-piercing packs to the left of the framelits. Gotta love those!
- See that little Post-it Note just beneath the shelf? It says “I love you” – Mom tacked it on some paperwork she mailed to me years ago. It was taped to my computer monitor for years, but I now keep it safely tucked away on this shelf.
Again, these are just things I’ve found that make storage and reference easier for me. You know me…I like to share.
Over the next couple weeks, I will share the ways I store my stamp sets, my punches, my inks and markers, my accessories and my papers.
Thanks for stopping by my blog today!
Brian


So neat and tidy Brian-you have shamed me into tidying my own craft room!
ps valentine cards winging their way over the Atlantic from Vicki and I…
🙂 Sure are! <3 And Lorraine I shall inspect your craft room tomorrow for tidyness when I come over for the Stampin' up party 😉 xx
Beautiful! Love the sticky note!
So super neat and organized!! Love the idea of keeping the SU dimentionals in a clear box and within reach. Sweet as pie is that little sticky note!!
Oh my goodness Brian, you are such a tease! I was assuming you would be showing us all three of your shelves in the area being highlighted today. Yeah I know, never assume, it’s usually wrong. Very nice presentation. This is how I store my framelits….I purchase magnetic vent covers from a home improvement store. I ones I bought came in a package of 3. I cut them down to the size of the framelit plastic container, plop the framelits on and slide it in. Fits perfectly. Works for me. Thought I would share with everyone. Have a good day!
Love organization. If you can’t find it, you can’t use it. I spent 5 years working in the middle of a storage room surrounded by metal shelves. Couldn’t get but one person at a time to stamp or scrap with me. Last October, I remodeled our bonus room to make my stamping space. I modeled it after Mary Fish’s space she has on her site by video. Now I hold classes and have everything in the same room. Everything has it’s place and I can find it. Thanks for sharing your space with us.
This was a nice tour . Where did you hide the rest of the stuff? It is so helpful to have “homes” for everything and I think the “sticky note ” is special . I store my Framelets the same as you and I also label on the outside but, I don`t put how many …that is so helpful because the other day I had to get all squinty eyed to try and “see” how many frames were supposed to be in the package and if one was missing. So I will do that today…. I like these visits into your “Zone of Creativity” and how you organize ….thank you ! can`t wait to see more ….
Great ideas with potential to be neat and tidy ALL the time. 🙂 Love the sticky note, those things are so cool to hold on to. Looking forward to your next organizational post, inspiring! Missed your artwork though! Can we have organization and a card? We want it all!
Brian – you are so fortunate that you have a space that is large enough to have everything in sight. I too have a craft room but too many hobbies for the 8′ X 10′ space. I am very organized however, most of my supplies are in labeled drawers or cabinets. I have found that if I don’t see it I don’t use it so many of my supplies sit and sit until I remember I have them. I keep trying to get my hubby to change “fun” spaces with me. He has the 32′ X 32′ garage (yes we do keep our vehicles in it) and I have this 8′ X 10′ room. I say leave the vehicles outside and give me the space. He looks at me as if I was proposing something from outer space! Some nerve huh?!!!!!
wow Brian your soo neat , love it , thanks for sharing !!!!
I’m always looking for ideas on storage. It seems i start one way and then need to
expand a different way. Your storage on shelves gave me some new ideas for
storing mine. Thanks for the tips.
Love your “Tour de Craft Space”. You have really inspired me to get busy organizing mine. 🙂
Thanks for sharing! There are some great ideas here for craft storage. I like your ribbon storage bin! Where did you get it? I’ve been trying to find a good solution to storing my growing collection of ribbon spools! It’s hard to find something that fits the small hole in the Stampin Up ribbon spools… any suggestions?
Charissa, check out this link: http://www.stampinpretty.com/2013/01/new-video-storage-ideas-in-my-ultimate-stamping-zone.html. Mary has a great solution for the ribbon enthusiast. I got mine at a big craft store on 2001 or 2002. Not sure where to find one now. Sorry!