


Janet joined my team at work about eight years ago. Every once in a while, she brought Lauren, her adorable 5-year-old daughter, to work with her. Lauren would sit quietly in Janet’s office watching Disney movies on a portable DVD player and headphones. She was very, very shy and always very, very polite – I still can’t get used to being called “Mr. Brian” or (even worse) “Mr. King”.
Last week, Janet mentioned that Lauren was celebrating her 13th birthday. Yikes! How did time go by so fast? Janet also told me they were switching out Lauren’s Disney Princess bedroom for a swanky French theme, featuring the Eiffel Tower. I immediately started running through the Eiffel Towers we have in our Stampin’ Up! collection. I decided to make these magnets for Lauren’s magnetic board in her new Eiffel Tower room: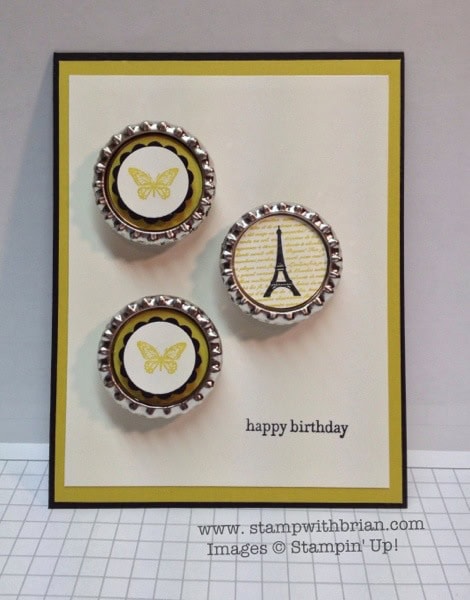
I ran three soda pop tops through the Big Shot, which rolls down the sides of the tops. The Big Shot sandwich looks like this:
Multipurpose Platform > Cutting Pad > Soda Pop Tops > Cutting Pad
I added magnets to the back of the tops.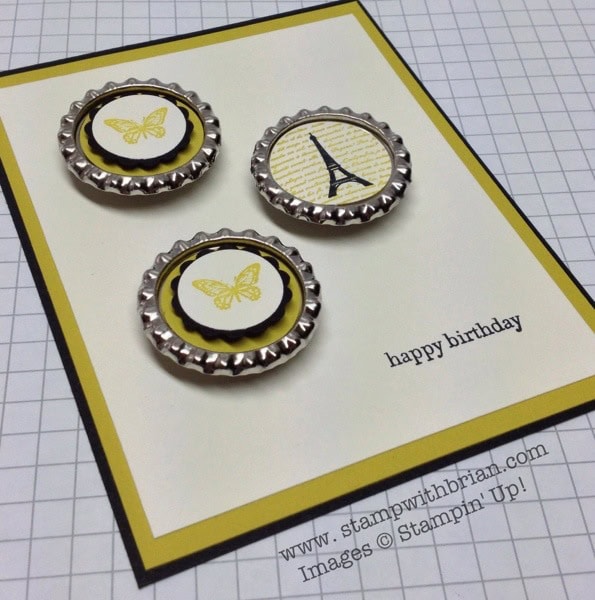
Stamp sets: Curious Curios, Teeny Tiny Wishes Papers: Basic Black, Summer Starfruit, Very Vanilla Inks: Summer Starfruit, Black Stazon Accessories: Soda Pop Tops, 1″ Circle punch, 7/8″ Scallop punch, 3/4″ Circle punch, Stampin’ Dimensionals
I wrapped this flat piece in a 4″ x 6″ cellophane bag and delivered to Janet – to which I promptly received a “Thank you, Mr. King.”
Thank you for stopping by my blog today. I hope you enjoyed this fun project.
Brian


What a brilliant idea, Mr King! I’m sure Lauren will love it!
Ohh la la, I love it!
Sweet! 😀
That’s the best part of being a Paper Crafter! Sharing your love of others! You knew just what to do! Happy Birthday Lauren!
What a fun, fun card for Lauren’s 13th birthday! I love that you made magnetics for the card that she can use in her newly redecorated “big girl room”, Mr. King! 😉
Good Morning MR KING…….oh that is so cute.
Oh, Mr. King, this is a great gift for this young girl, she will think of you every time she uses this magnets. It’s kind of bitter-sweet to change your little girl’s room from a kid’s bedroom to a young woman’s bedroom, time indeed rushes by you like the wind. Happy 13th. Birthday, Lauren!!!!!
Happy Birthday,Lauren ….I have a niece named Lauren. This is a great idea for a lot of cards . Make your embellishments magnets …I make magnets out of a lot of things and I think the bottle caps are just perfect for that ! Guess I will have to get some before they go bye-bye …. Oh, I can remember when Maria used to call you Mr. Brian …. you just get that kind of respect being a person of your talents !!
I love this idea, Mr. King! And it’s such a wonderful thing to put so much thought into personalizing a gift.
Great idea — you are so talented – Mr. King! Wishing Lauren a fun birthday — she will think of you every time she uses those magnets. Great card too – Thanks for sharing your creative talent with us.
Oh Brian, you’ve shown your Achilles Heal and will forever forward be know as Mr. King!
Wonderful card – now, question – It looks as though there are dimensionals in the pop top lids but is that also how you held the magnets to the paper? If so, will the dimensionals peel off cleanly from the magnets?
Grace, I used dimensionals to pop the butterfly and scallop on two of the tops. The magnets I bought (after magnets were discontinued by SU!) are really thick, which is great because it allows Lauren to grab the top easily to move it around her board. I attached the magnets to the card with some glue dots my neighbor gave me (they aren’t permanent – they are like the dots that come on the back of gift cards that stretch and stretch and stretch). Fun!
Thanks Brian – I really love the card but was not quite sure how you attached the magnets so they wouldn’t tear the paper when removed from the card or if the magnets would have sticky on them once removed. You did a fantastic job and that was super creative.
How sweet and touching and so very kind of you. When I went to flatten my first soda pop top I looked for my most scratched up cutting pad. Now I save it for that purpose. It’s always a little sad taking a new pad and running a die through it and seeing its very first scratch. A tip I learned from another Stampin’ Up blogger.
Oh .mr. Brian, you are so sweet and thoughtful! Thirteen is an interesting age and I am sure she is lovin’ these special magnets!
I try to make my comments before reading the others, seems I should have and not added to the Mr Brian or Mr King!!!
Oh Mr. King what a sweet thing you have done for the young teen. I know she will love them!
How sweet! Happy birthday to Lauren 🙂 how did you stick your magnets to your card?? Tfs!
I attached the magnets to the card with some glue dots my neighbor gave me (they aren’t permanent – they are like the dots that come on the back of gift cards that stretch and stretch and stretch). Fun!
Super great idea Brian,does adding Mr. make you feel old?? this set and the caps have definitly caught my eye, you are constantly causing me to alter my wish list!! lol Thank you for sharing with us, Mr. Brian
I am happy to enable your Stampin’ Up! purchases, Lynne. 🙂
I have yet to dig into my soda pop tops and create with them. I did have magnets in mind for some of them, and I have the Curious Curios stamp set. Lauren is bound to love them for her French bedroom makeover. I know I would! Mr. King, Mr. Brian……..ummmmm think I’ll just stick with Brian. 🙂
Lovely, fun and very creative. What a wonderful “keepsake” card!