


I often use many layers of card stock on my cards, and I always work hard to make sure the layers are perfectly aligned. Many of you have asked me how I get my layers so straight (well, aren’t you sweet?). Well, you know I love to share. Rather than bore you with a long write-up, giving you step-by-step instructions, I decided to share my tips in a video. Woo hoo!
I have additional tips and facts, so please don’t go away after the video. Oh! And there’s also another giveaway! Here’s the video:
Additional Tips about Multipurpose Liquid Glue
- Dual-tip Applicator. There are two tips on this glue bottle – one is a fine tip for precision placement, and one is wide for larger coverage. I’ve never used the wide tip, but I’m sure there are people who use it all the time. If you are a demonstrator and use this glue in a class – make sure your customers know to use the fine tip (that’s from my own experience – a tremendous glob of glue is very difficult to manage).
- Permanent. I use Multipurpose Liquid Glue for almost all my stamping projects. Once you glue it down, it’s stuck! No card is going to fall apart in the mail, and no layer is going to be pried off with dental floss. This glue is made of a latex rubber acrylic resin that’s not easily pulled apart.
- Temporary. Sure, two pieces of paper that are glue together with Multipurpose Liquid Glue are permanently stuck together. Did you know, though, that this glue can also be used as a temporary adhesive? If you apply the glue to one sheet of paper and allow the glue to dry before adhering it to another piece, the glue is a wonderful temporary adhesive. Woo hoo!
ANOTHER Giveaway – on my Facebook Page
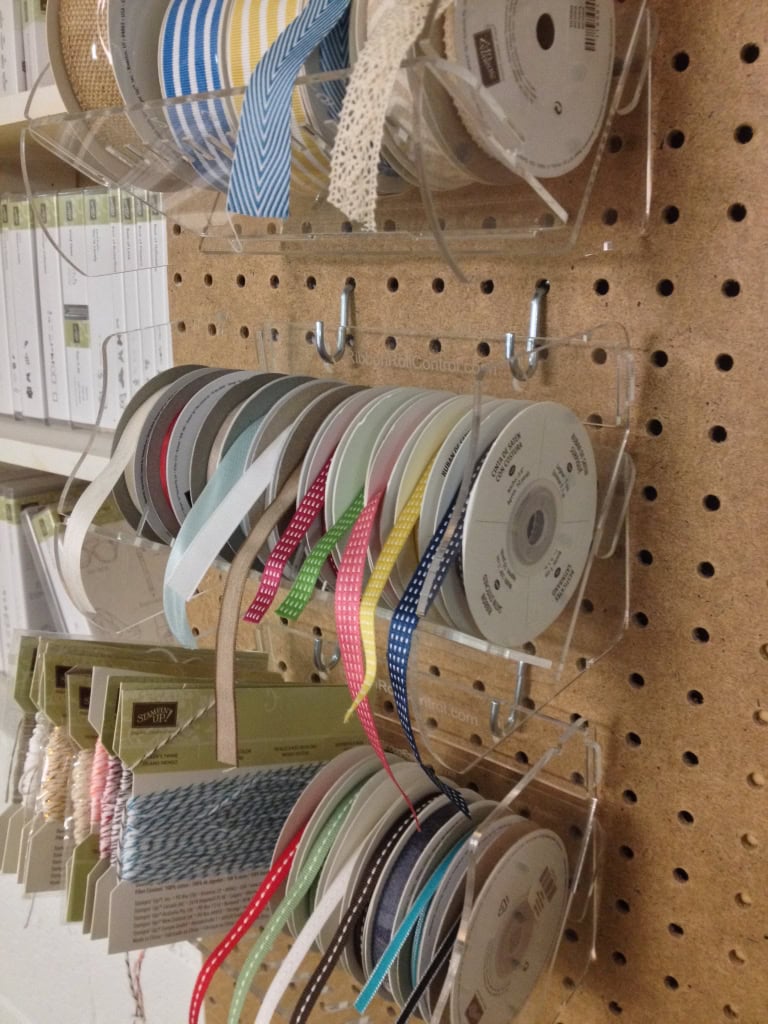 The Blog Candy Giveaway I hosted on Friday was a huge success. You really wanted to win a Ribbon Roll Control holder of your very own – I couldn’t believe the number of comments I received on Friday’s post (if you want to read all 300+ comments, click here). 🙂 In the end, Cindy won the giveaway, and her candy is in the mail to her now. Yippee!
I felt bad that so many people were left out, so I talked with Trish at Ribbon Roll Control, and she’s giving ONE MORE ribbon holder for me to give away. How incredible?! Only – this Blog Candy Giveaway isn’t on my blog – it’s on my Facebook page. All you have to do is “LIKE” my Facebook page and comment on my BLOG CANDY GIVEAWAY post there. To find my Facebook page, click here or the picture below: If you have already “liked” my page, just leave a comment. How fun! I’ll draw a winner on Wednesday – so “like” and “leave a comment” now. I’m pretty sure you are going to be the winner this time. 🙂
To learn more about these great ribbon organizers, go to www.ribbonrollcontrol.com.
Thanks for stopping by my blog today!
Brian
CLICK HERE to order Stampin’ Up! products 24/7.


I think this ribbon holder is fabulous!! and so are you!!
Such a good video, Brian, with your humor inserted as a extra bonus. I have always chosen the snail adhesive or double-sided tape for matting … which has meant that my alignment has suffered more times than not 🙁 It has always frustrated me, but I kept using them. I just didn’t want my cards to come apart. After watching your video, I plan to “step away from the snail” and try the Tombow liquid adhesive for matting – today! Thanks, again, Brian!
I love the weight that the glue adds to a project. Thanks for the video you handsome thing! (I can say that since I think I’m old enough to be your mother.) : )
I enjoyed your video, I was still in my early morning crabbiness but you made me laugh!!
Brian,
Could you do a video on cutting – trimming, etc. Which trimmer you use, and how you get your cuts so straight?
Thanks,
Julie
PS This was great. I’m going to give this glue a try!
Finally…I was wondering when you were going to address the question on your good looks. You crack me up! I have strayed away from using so much snail also. The freedom of being able to wiggle around your product getting perfect placement and not ruining something because it’s ‘caddy wompus’ is priceless. I go into a frenzy when something is glued on wrong and have to start over. If anyone is like me I hate to waste my products. Thank You Brian for great tips and video.
Love your video. What a natural you are, Brian! Great tips!
This is a good tip and I am going to try it. I can’t get anything lined up ever. I always have something out of whack so I am really going to try this. I also liked you on Facebook. Enjoy getting your daily emails.
Het Good Lookin’! Awesome video.
Thank goodness- mystery solved on your good looks! Fantastic video and I am going to say goodbye to snail and hello to Tombo for my next card. Thanks for the laughs and the great tips Brian.
Great video this morning, it’s fun to start the morning laughing!
Love your video and tip. The first question..I knew the answer to!!!! Hugs my friend!
Love your video Brian! You handsome devil you!! 🙂 But on a more serious note, I LOVE my TomBow Glue! I’m able to adhere my layers really well with my Snail but TomBow does allow you wiggle room so depending on what I’m doing, I reach for TomBow! Keep the videos coming!!! 🙂 Now over to your FB page as I would love to be the winner of you Blog Candy Give-A-Way!
You are too funny! Thanks for the tips on the TomBow. I just started to use it in place of my ATG.
Great video! I, too, love the Multipurpose Liquid Glue. It is wonderful. My only problem is I am sometimes not quick enough to slide it around to make my layers more straight. I guess practice makes perfect, because yours are sure perfect! Thanks so much for sharing your tips.
What a cleaver idea to use Tombo glue to make cards so perfect. Thanks for sharing these tips with us. I know for me, I need all the help I can get. You are quite handsome too!
Leaving glue line indentations for my fingers …. okay, now this is genius. LOVED the video, Brian! Thanks, too, for the tips you handsome devil.
Thank you for giving away another one of these amazing ribbon holders!!
Loved your video! I posted to your FB page. It is under my husband’s name tho’. Thanks for another opportunity to win.
I love your videos!!! Please do lots more of them:) I guess I will have to start using my Tombow more!
Very good. I’ve learned to love the glue too!
Well, I have been using my Tombow today and ignoring my snail . And I will say that it makes a big difference in time to align . Plus I don`t have those little glue strings on the edge . I also am not usually a glue person because I get it everywhere and I have a faulty nozzle on mine . My glue doesn`t come out in a line . It comes out by the spoonful so after watching you doing your crafty glue placement I am ordering a new one ! And I am not squeezing it hard . Besides it was hard to concentrate on what you were saying because I was so bedazzled by your looks !! Sigh…….
i want to know how many takes it took to answer that first question without your cameraman shaking with laughter! great little vid–keep after it; the advice is very helpful, and you’re getting more comfortable.
Loved the great video! Gonna have to get some if that glue!
Ok, now I will need to follow you on FB daily also, can’t get enough of you, LOL Love your video keep them coming
Brian,
I love to layer…..I mean I “really” love to layer! I have always steered away from glue because I don’t like the “ripple” appearance under my paper….I’m going to give this a try! Thanks for sharing……”cutie”! (yes, you did blush!)
Karen
I was behind on your videos, so I watched this and the stamp-a-majig tutorial just now. Though I thought to myself, I’ve been using tombo and my jig for a while, I kept an open mind that I might learn something.
Sure enough, you blew my mind with your little glue indentation to prevent sticky fingers. Also, I’d been using vellum for a jig sheet to save with stamp sets, but acetate is so perfectly clear, it’s even better than the reusable plastic square that comes with the jig itself.
Oh, and I use the jig T side up. Any bonus to flipping as you did?
Kudos once again, Brian.
Brian, the following vignette is a true story: yesterday I was making a card at the last minute (my regular modus operandi), and I thought to myself, “I wonder how Brian King always aligns his layers so perfectly?” So thank you for this timely message. I only wish I had seen it before I finished my fine card with the wonderful components and the layers ever so slightly askew. You rock, dog!
I LOVE your videos lol 🙂
LOVE that tip about indenting for finger space… CLEVER!!!!!! Thank you Good-Looking Brian. =)