


Before I share this week’s project for Friday Mashup, I want to thank Holly, the creator of Friday Mashup, for selecting my Get Better card in last week’s Friday Mashup challenge (you can see that card here). I love to design and share with you, but it’s always nice to be recognized by a talented design team member. Thanks, Holly!
This week’s Friday Mashup challenge created quite a flurry of creative energy in the Fungeon this past weekend. The challenge was to create a project that features trees OR that uses embossing OR that combines the two (thus, the mashup). I was stuck on “the trees.” I pulled out sets that showcase trees (Lovely as a Tree) and could be made into a tree (Hardwood, What’s your Type?). Still I was stuck. After I determined I wouldn’t have to show an actual tree to meet this challenge head-on, it all came together. Woo hoo! Here’s my project:
And here’s the challenge banner for Sara’s challenge this week:
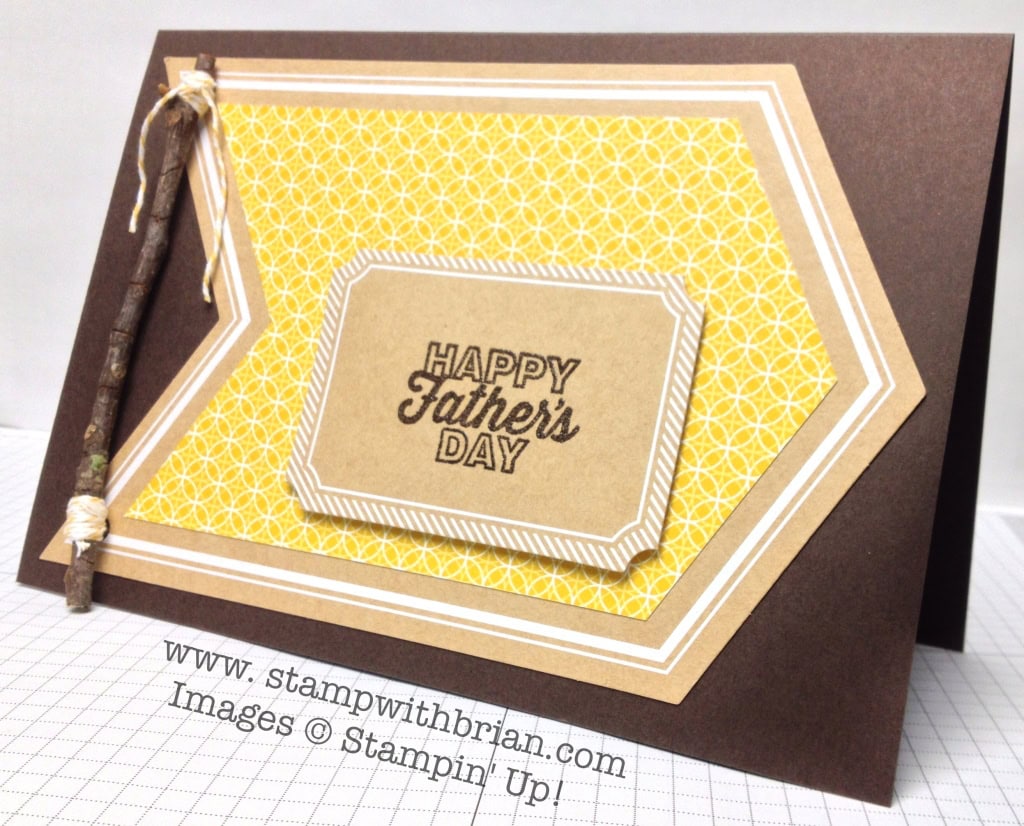
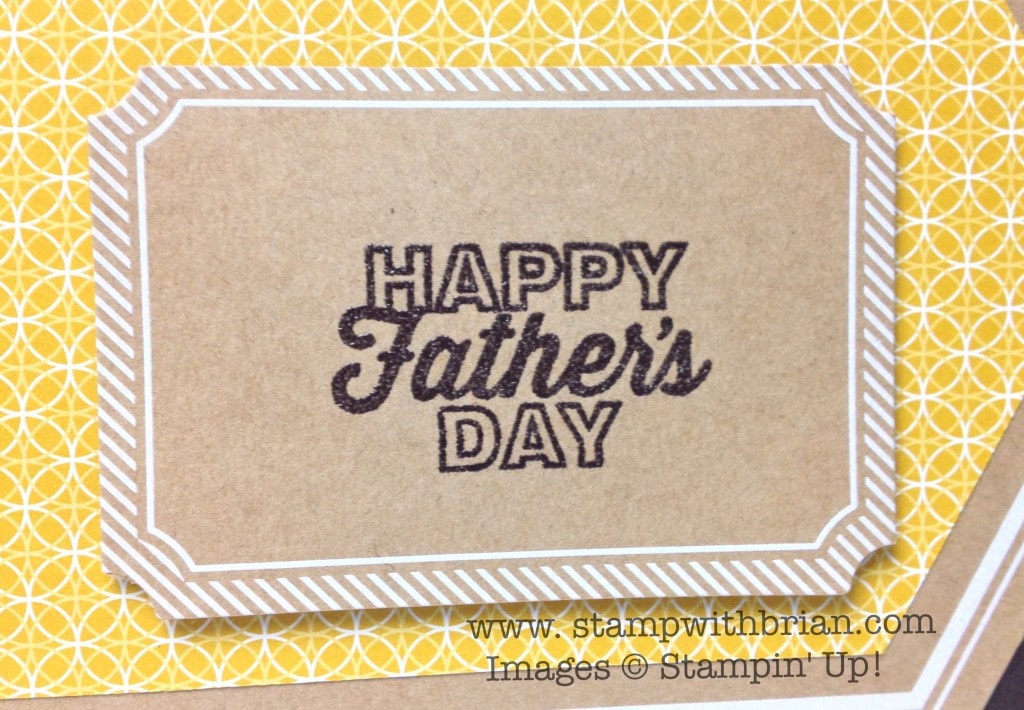
I love the kraft-y appeal of the banners and accessories in the Celebrations Basics Kit. First featured in the 2014 Occasions Catalog, I’m so happy to see that the kit is also included in the 2014-2015 Annual Catalog. Yippee! My first idea was to use the tag on a card (the central piece with the embossed sentiment is part of the kit and can be used to make name tents), but I decided to go all-in and pull in one of the banners, too. It made for a super-big card (the cardfront is 8″ x 5-1/2″). I don’t have paper big enough to make an envelope for this card – something this special would need to be hand-delivered in shallow box. 🙂
I layered a piece of Eastern Elegance Designer Series Paper inside the banner piece. How in the world did I do that? It’s really not that difficult. Here’s a quick step-by-step of how I cropped this DSP to fit inside the banner:
- I placed the banner on the piece of Designer Series Paper and traced the banner onto the paper with a pencil. Look at me – I’m justa’ tracing around that banner with some mad skills.
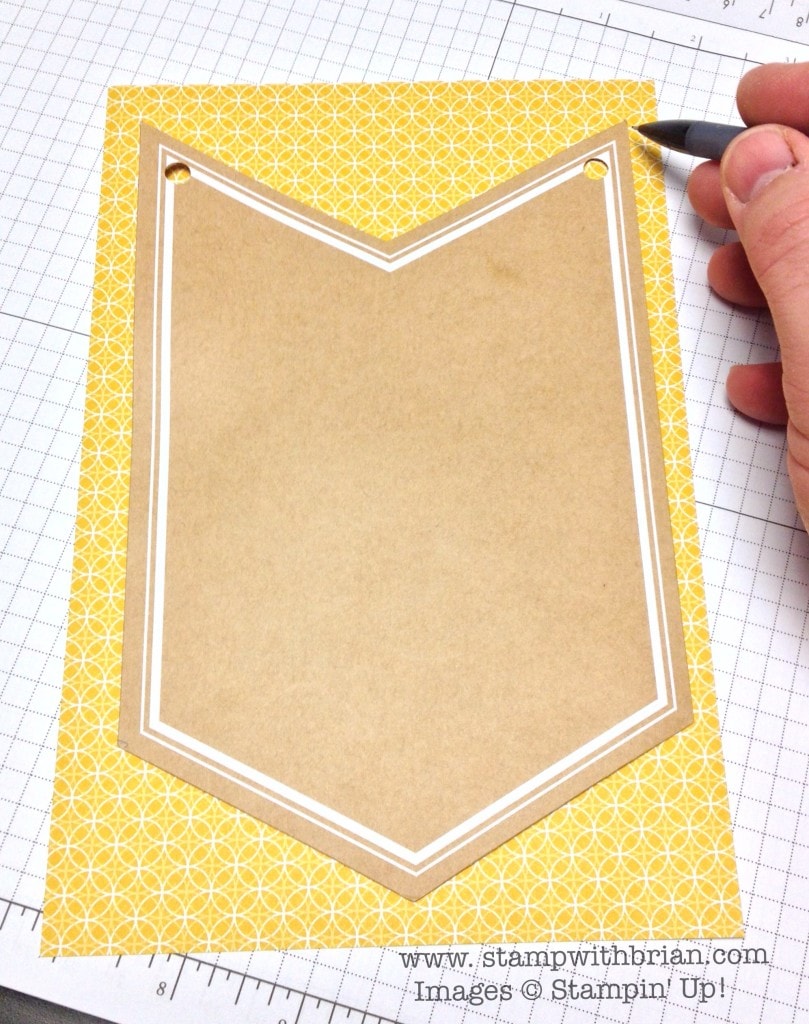
- Next I cut along all the edges of the banner I had just traced to create a piece of DSP that exactly matches the banner shape.
- Then I lined up each of the lines along 1/4″ on my trimmer and trimmed off 1/4″ on all sides. That way, the proportions all stay the same – it’s just that the shape is a little smaller. Woo hoo! This method will work on any shape that has straight edges – it can still work on a wavy or rounded edge, but it’s infinitely more difficult – and I don’t have that kind of skill.
- So, how about the concave end of the banner? How did I cut into that? It’s simple. I slid the banner down the originally-traced piece and retraced it. Again – you want the same proportions.
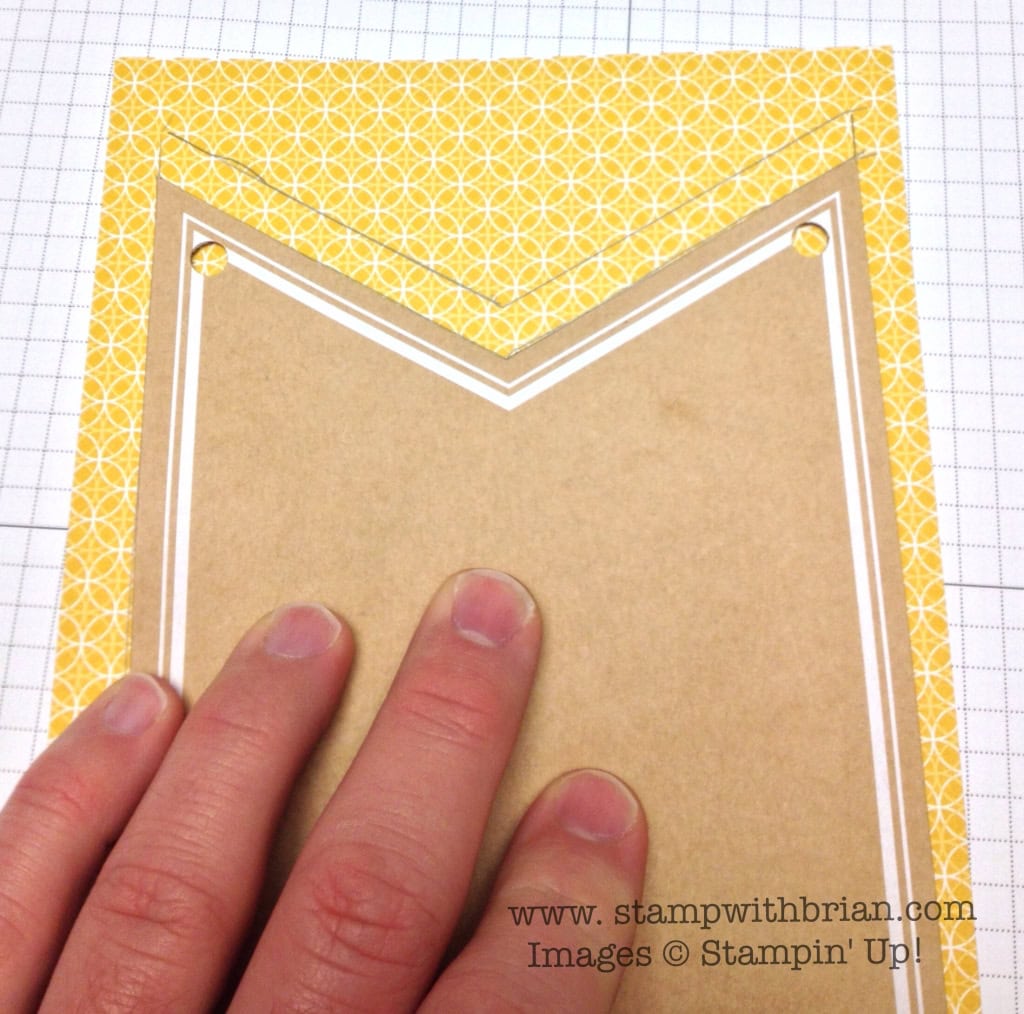
 See, geometry class proved to be a little handy, no?
Stamp Sets: Paper Pumpkin (May 2014 Kit) Papers: Early Espresso, Eastern Elegance Designer Series Paper Accessories: Celebrations Basics Banner Kit, Early Espresso Stampin’ Emboss Powder, Crushed Curry Baker’s Twine, Stampin’ Dimensionals, Twig from Tree (not Stampin’ Up!) 🙂
Thanks for stopping by today!
Brian

“Kick the Tires” with Swatch Books and Product Shares. I posted my product shares and swatch books on Saturday. Shares are a great way to get a little taste of everything in the catalog – to kick the tires before you decide what you are going to invest in. If you would like to read more, please click here. You won’t be sorry – I promise.
Talk to Me About Joining Stampin’ Up! Stampin’ Up! will soon be announcing a “Stampin’ Up! Starter Kit” promotion. If you have ever considered buying the Starter Kit (whether it’s to build a business or to earn a great discount), please reach out to me today. If you know of anyone else who has considered it or would be a good fit for Stampin’ Up!, please send them to me. I am part of a wonderful group of fun, positive people and am always happy to add more. 🙂 Please email me at [email protected] so I can answer your questions or set up a time to chat. Woo hoo!


How genious to use a real tree !!! I love it , the banner is perfect and the colours manlike !
Greetings, Anita
“Wooden`t ” you just know that you could come up with something creative? This is perfect for that father that likes to do wood work . A great card !
Great idea! : )
I love the elements you used to engineer this card. Some occasions really deserve a card bigger than the standard A2, and this is a smashing example. Love this card, especially the twig!
A seemingly difficult challenge, but a very clever “mash”. Well done!!
Oh WOW!! what a fabulous Father’s Day card!!! It’s rustic and elegant and very visually appealing for any Dad, whether he is an outdoorsman or not.
I second the motion of my dear friend Sonny, only you could come up with such a great card and the “mathematical” directions are not so hard to figure out, specially for a very mathematical challenged person like me.
Thank you for the inspiration.
So Brian – Did Bandit bring the twig in for you? LOL
What a great card! The size just shows a Dad how wonderful and larger than life he is. And of course, your clever, intuitive mind and your willingness to share it with us makes our life a whole lot easier. Thank you!
you have mad geometry skills, man. aren’t you glad you found SOME use for them?!
i’m wondering about the placement of the sentiment. why not in the center? just preference, or did you have some design reason? just curious.
That’s a good question, Jenn. I moved that sentiment around on the banner several times and just decided it looked more balanced in the bottom, right corner. If there’s some design reason, I’m not sure I could define it – just liked it better there. 🙂
Great card Brian. I love your use of a twig, it’s a very unique embellishment. Congrats on winning last weeks Friday Mashup challenge!
This is fantastic, I especially love the twig, LOL Awesome layout
Ah, Mister King…your creativity amazes me. I like your thinking outside the box! TFS with the Friday Mashup this week:)
LOL Brian, when I first glanced at this post I thought it said “Friday Mishap”!
Certainly not a mishap. This is a card to love!
Your genius is showing.☺️
Really awesome card and fantastic embellishment! Love it 🙂
Brian, I love your creativity on this card! Who would have thought to grab an actual part of a tree to get both parts of the mashup?! I didn’t even have that in mind when I decided on trees and embossing. You definitely brought a smile to my face with your card. 🙂 Thanks for joining us this week at the Friday Mashup.
Sara
Fantastic idea to use a twig, that definitely fits the challenge! I also love the use of the yellow DSP, really helps make the card pop!
Thanks for playing along with us at The Friday Mashup!
Ha Ha I love it Brian!! What a fun idea to use a real branch.. Thanks thinking outside the box!! The layout you used is great.. love the pennant. Thanks for joining us at The Friday Mashup.