


I’m so excited about so many great, new products in Stampin’ Up!’s 2015 Annual Catalog. One of the must-haves from this new collection of products is the Banner Triple Punch. I used it in a project I shared with you this past week, but I didn’t tell you much about it. Why? Because I had this fun video planned for you.
Trust me – you want to watch this video! I brought in a special guest to help with this video, and I think you’re going to LOVE it!
What do you think? Is that the best video you’ve ever seen?! I hope you loved watching it as much as we enjoyed pulling it together for you. 🙂 Don’t you love this punch? After that expert advice, how could you not?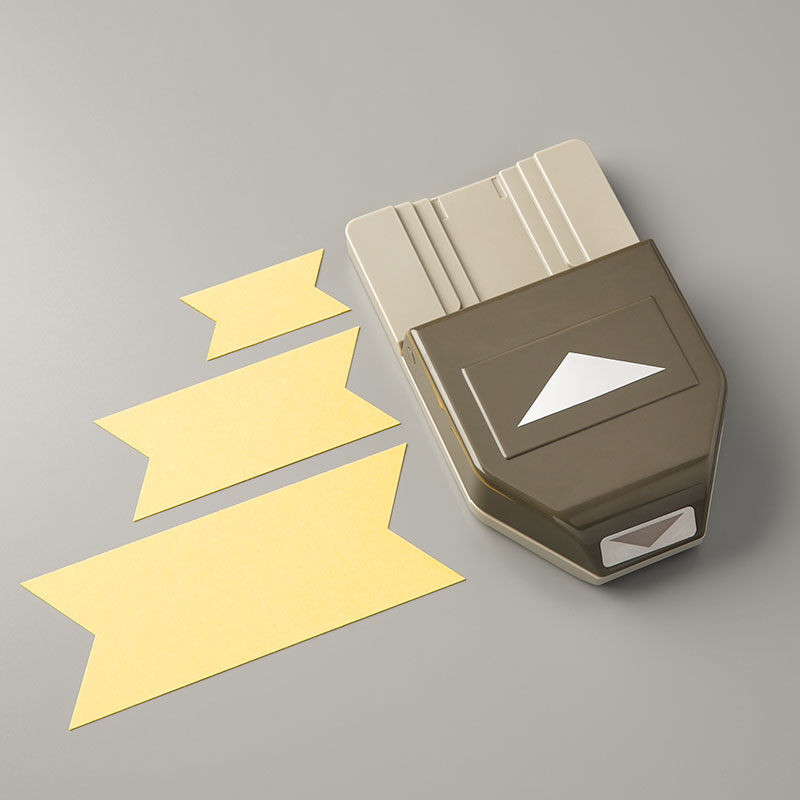 Tips, Tricks and Reminders
Here are some tips from the video that will help you to love your Banner Triple Punch:
- Three Designated Sizes. The Banner Triple Punch is designed with guidelines for three banner sizes: 1″, 1-1/2″ and 2″. As Mom found out, it’s best to trim the strips about 1/16″ shorter than the recommended widths to make sure they slide in perfectly.
- Other Sizes Work Too! While the punch works perfectly with the recommended guidelines, other sizes work, too. If you carefully position the strips in the center of the punch, using the grooves as a guide, you can easily get the punch you want on the edge of the banners. What I’m trying to say is – if you don’t like to play by the rules, you can still be successful with this punch.
- Off-Center Banners are Cool. Do you want to be super-cool? By not centering your banner, you can really achieve a unique look. I happened upon this finding my mistake but really liked the way it looked. Mom showed you how easy it was – I hope you’ll give it a try! I shared this card on Thursday that uses this fun technique (you can click on the card below to see my original post):

Thanks for stopping by today!
Brian

Are You in Round Two? Did you miss out on my first round of product shares? If you want to get in on this wonderful way to get a portion of a lot of stuff, join in today. For more information (or to sign up), click here.
 During the month of June, Stampin’ Up!’s new Join promotion gives you LOTS more reasons to smile – one of those reasons is that you get TWO FREE STAMP SETS OF YOUR CHOICE with the purchase of your $99 Starter Kit. $99 gets you $125 of product (your choice), 2 free stamp sets, free shipping and 30% off your first $150+ order in your first 45 days as a demonstrator. YIPPEE! You also earn a 20% discount on your purchases (with potential for increased discounts). Joining MY team gives you access to an amazing online community, daily inspiration, monthly online gatherings and…well…me. 🙂
- $125 of amazing product of your choice + free shipping for $99.
- 2 free stamp sets of your choice.
- 30% off the first $150+ order in your first 45 day.
- an ongoing 20% discount on your purchases.
- access to amazing community and daily inspiration.
- monthly online gatherings.
- no risk to ever host a workshop and no penalty to drop.
If you want more information about membership in my Stampin’ Up! group, please email me at [email protected]. If you are ready to join, click here.


Man I love how these these Georgia ladies talk…..I am such a southerner at heart……it would have been perfect if she had said “I love this d&$# punch”. Lol……..love the video!
Your mom did a great job, Brian. I hope we see more of her videos and yours, of course. Loved the tip she shared.
Mamma is precious!!! I love her suggestive marketing skills. “Buy several of these punches and many other things!” LOL
I absolutely LOVED watching your special guest showing the spectacular features of the NEW Triple Banner Punch! What a sweetie she is and she did a fantastic presentation! I just think she’s precious. You need to have her on your “video shows” more often! I, also, smiled real big when she used her professional marketing skills saying ‘buy SEVERAL of these punches and many other things!’ So cute! Y’all make a great “team!” Hugs!
This is so wonderful!!!! Absolutely love it. She is so precious. You are one lucky man. <3
Fantastic job Mom!!! I might just need to get one (or more) of the triple banner punch.
Your mom is a great spokesperson for you – who could resist purchasing at the request of a lovely southern belle. What Fun – kudo’s to her – great job too.
What a cutie your mama is! She did a nice job, especially since she is not as practiced as you!
How about featuring her again? Love her Southern accent…what happened to yours?
Thank you Miss Mary for the presentation. I enjoyed it, but your first one years ago was the best!! What we Mom’s do for our children, we are so proud of. God bless you.
Oh my goodness what a doll, the epitome of a southern lady. She could sell card stock and DSP to the colorblind. She makes me wish I didn’t already own that punch.
How fun to have your mother present the video! She is great!
Loved this so much! Your Mom did such a great job!
What a treasure! Mom is just priceless!
Mom’s rule!
Loved this video. I’d like to see you both in a video together. That would be fun!
Your mother is adorable! Oh and her video showing the “how to use” the banner punch is great too! This is a nice punch, party sharp and easy to use!
On gosh, Brian, your mum is adorable!! Great video!
Great video, and love your Mom’s accent (I really wanted to write Mum).
Your Mom is a star..what we won’t do for our kids…..I LOVED her video!
It was so nice to meet your momma, even it it was just on a video. Now I see where you got your sweet demeanor from.
Great video Mrs. King! You’re a natural! Now we know where Brian gets his wonderful energy and happiness from. We adore your son, and I wish I lived in Atlanta so I could squish him! 🙂 If I didn’t already own that punch, I’d be buying it! So nice to meet you! Hugs to you!
Your mom was a sweetheart, and so calm about it. I know that you are proud to be able to call her your MOM. You 2 ROCK.
Loved, loved, loved the guest you had today! She did a great job sharing that technique with us. Maybe we’ll see more of her? I sure hope so!
I love me some Mary King! What a great job!
Your mom is absolutely darling!!! Great job Mary!!!!
Finally – Mom gets some time in front of the camera! And she did such an excellent job. Please pass along my congrats – she may not be an actual demonstrator, but she sure “talked the talk”!
Love your mom give her more air time
Your mom rocks… I loved this video… and thank you for the not lining up tip for that nice banner!
You mom is fabulous! Lucky you!
Mom, you did a fabulous job! I may be a day late to seeing this, but still wanted to leave a comment for you!
I can hardly wait to give it a try, just as soon as my banner punch arrives!
Just viewed your Moms video, she did a great job! Lucky you to ave such an enthusiastic supporter!
Way to go, Mom! That was a great video! I’m sure Brian would be happy to sign you up as a demonstrator, and you could start your very own blog!!
Your mom is adorable! Great video, thanks for the tips 🙂
Brian-Obviously you get your on camera talent from your Mom. She did a great job, very relaxed I felt like she and I were across the table from each other.
Lovely, lovely Mrs. King!!! That’s 2 lovely’s; Lovely video, Lovely Mrs. King.
You sure brightened my day!
Blessings to you and yours!!!
Your Mum’s not a demo? Why not ? – she’s a natural! I loved watching and listening to her. Please send her my congratulations, all the way from the UK!
Love your mom! Great video.
Brian, your mom is a treasure! God bless her heart. She did a great video for you. Hugs to Momma King! 🙂
I didn’t see this till today, your Mom did great! I hope we get to see more of her!! You too of course!
Your mom did a GREAT job, she’s a natural.
I love this video. Your Mom does a great job! I love it when family is supportive and she really does speak the stamping language. Thanks for sharing with us.
Brian, your mom is a natural in front of the camera and with cardmaking! I hope to see more videos of her in the future!
Great job Mom!
Oh my gosh! That was AWESOME!!! Your mom is a natural. I was going to do a similar tutorial but how could I possibly top that? Well done Mom!
She’s darling. The punch is on my list.
Your mom is just the sweetest thing ever! Loved her video … can’t wait to see more! Thanks for sharing that with all of us!
Brian, now we know for certain the “apple” that is you; did NOT fall far from the tree! Your mother is fabulous!!
that was just precious! a keeper for sure 🙂
Hey Brian
Just saw your mom’s video. How wonderful to include her in your business! She is a sweety. Her salesmen ship skills are great. I bet triple punch goes on low inventory after this video. I loved my mom and miss her a lot. She helped me once with my old career when I needed some extra help and we had a ball.
I want to meet your mom someday and give her a big hug!
Nancy in Colorado
Oh my gosh she’s cute! Way to go Mom King! Great job, watch out now Brian……you might be replaced!
Ohmyheartandsoul! Your mom is totes adorbs!
Oh.My.Gosh! You’re mom is awesome and did a great job. I hope she comes to WCMD in October so I can meet her.
Your mom is a hoot@! Love seeing you spend time together. Hope you give her a raise really soon!