


When I was preparing projects for my local stamp club, I had a very clear vision of what I wanted to create. I wanted to construct a shadowbox with cardstock that showcases elements of the Sailing Home Bundle. Easy, right? To build the project, I enlisted the help of my friend (and InKing Royalty team member) Julie DiMatteo. Julie is a super-talent who always blows my mind with her 3-D projects on her blog (The Paper Pixie) – she’s made similar boxes that house small gifts, and I knew I wanted to use that idea for my shadowbox. Here’s what we made:
 The angle of the photo makes the left side of this shadowbox look a little twisted, but it’s perfectly aligned with the rest of the box. My club members enjoyed putting this together over the weekend.
Tips, Tricks and Reminders
- Sailing Home. How can you not fall in love with the maritime-themed Sailing Home Bundle?! I’m a little partial because I grew up by the ocean with lighthouses, sailboats and sunburns. Even if you’ve lived inland your whole life, you can almost smell the salty air and feel the warm breeze from the images in this set – perfect for a pick-me-up or celebration. Here’s a look at the Sailing Home Bundle:
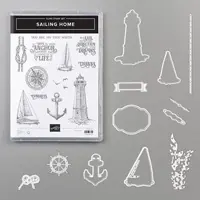
 There’s an entire suite (stamps, dies, papers, embellishments, ribbons, scrapbooking cards) built around this theme – you can see all of these products in my online store by clicking on the photo below:
 It’s these stamps and dies that helped me to build the scene on the inside of my shadowbox. Here’s a closer look:
- Building your Shadowbox. As soon as I told Julie what I wanted to make, she went to work on a template that uses an 8-1/2″ x 8-1/2″ piece of cardstock. You can build this frame with a couple of friends: your Simply Scored, your paper snips and this trusty diagram (you can click on the picture below to download and print a .pdf):
 Even though you start with an 8-1/2″ square for the shadowbox, the entire 8-1/2″ x 11″ piece of cardstock is used in this project. With the remaining strip, we built a kickstand to prop up the shadowbox (measurements included on the template above). Here’s a closer look at the kickstand:
- More from Julie. Julie created a similar shadowbox with a different design for her Facebook Live this past week. In today’s post on her blog, she’s sharing that project and a video for assembling this fun shadowbox. CLICK HERE to see Julie’s project and to watch her video.


Bundles: Sailing Home Stamp Sets: Sailing Home Papers: Night of Navy, Seaside Spray, Old Olive, Mossy Meadow, Thick Whisper White Inks: Soft Suede, Night of Navy, Seaside Spray Accessories: Smooth Sailing Dies, Simply Scored, Mini Glue Dots, Stampin’ Dimensionals


What do you think? Isn’t this suite amazing? I hope you’ll give this shadowbox a try – and I hope you’ll pop over to Julie’s post to see her project (CLICK HERE). Thanks for stopping by today!
Brian

 Check Out the New Catalog! Stampin’ Up! released the 2019 Annual Catalog last week – what fun! So many wonderful, new products to see.
- CLICK HERE to see all the new Suites in the catalog
- CLICK HERE to see all the new videos and learn more about the new catalog.
 Placing an order today? Of course you are! If you are placing an order for $150 or more, I want you to enjoy all of the Host Rewards you have earned. If your order is less than $150, I’d love for you please add this Host Code – NWANWTKG – when prompted. Thank you!


Brian how fortunate for you to have a Julie on your team! Together, you two make a fine pair with your individual talents! Love this shadow box, and I can’t say enough about the stamp set. At first, I thought to my self I already had a light house stamp set, however; this one compliments and enhances the high tower set, it’s so detailed “perfect”! Thank you both for creating this fun project!
I agree – Katrina! I love the energy and talent Julie brings to the team. So glad you like this project and set – I agree that it’s different from the other lighthouse and am glad both can be in the same catalog together. ♥
Great shadow box, Brian. Maybe I’ll attempt this one. I was thinking of a way to showcase this suite. When are you going to make another video? Have a blessed day.
Thanks so much, Nancy! It’s a fun project. I might get back to it at some point, but I stay pretty busy. 🙂
Brian, I’ve been a fan of Julie for a very long time, her amazing projects, little boxes and now, this frame, are truly amazing.
I’ve created many of her boxes to give to my grandchildren, to my youngest daughter’s co-workers, my neighbors, and our mail lady who, rain or shine, hot or freezing weather, delivers our mail every day.
Thank you and Julie for sharing this beautiful and fun project with us today.
Hugs.
Maria.
I couldn’t agree with you more – I adore Julie and the projects she makes. Such fun to share those with others. Thanks, Maria!
Nice shadow box card
Thank you, Nancy! I’m so glad you like it. ♥
Be still my heart……What a FABULOUS project my friend. With both you and Julie heading up this project……It COULDN’T miss. Thanks for sharing.
Thanks so much, Kadie! It took me a couple of tries to get it right, but it was well worth the sacrifice. ♥ Thanks!
I thought it was a wooden frame until I continued reading. SO clever!!!
It’s such a fun project to make. Thanks, Dawn!
It’s amazing how these little shadowboxes can compliment bundles, and how Julie’s templates can save the day. I enjoy the challenges of the 3 D projects and changing it up a notch from a card. You’ve done a great job Brian on this project, do more!!
Thanks so much for the kind words and encouragement, Karen! ♥
What a WOW! project! I adore the mixed greens for the seaweed!
Thanks, Mary! ♥
Awesome! Great Father’s Day idea?❤️???
Btw…I was one of many who bugged you in Orlando for a picture?…St Louis fan club…?
🙂 Thanks, Jen! So glad you like it. ♥
Awesome!! I absolutely love this! What fun you two must have had figuring out this adorable frame! Julie makes it look so easy – I think I have to give it a try – maybe I’ll use the Free as a Bird bundle? Thanks again for sharing your remarkable talents!! Have a great weekend!
It’s a fun project, Elisha! Glad you like it! I wasn’t 100% successful the first time, but I got it right after a quick study. 🙂 Hope you love it, too!
An amazing project (and Julie is amazing too). Thanks for the inspiration!
Thanks so much, Windy! We had lots of fun with this project. ♥
Two clever critters on the loose !! This is very inspiring for other stamps and dies in the new catty !
Love it !
It’s a funny statement (two clever critters on the loose) because that’s exactly how it felt. 🙂 Thanks, Sonny! ♥
I can’t even begin to tell you how much I love this shadowbox card and I can’t wait to try it myself. I watched Julie’s video and she made it seem almost simple to do. I know your group must have absolutely enjoyed every minute of learning this technique. How wonderful that you chose this exciting card to share with your group. I think you should move to Maine so we can attend your gatherings! Thanks Brian.
Packing the truck to start my trip, Grace. 🙂 SO glad you like the project and hope you have lots of fun with it – it’s great fun to make. ♥
I had so much fun creating this with you, Brian! Thank you! I’m the luckiest!
How can YOU be the luckiest when I am clearly the luckiest?! Thanks so much, Julie! ♥
Julie is as generous and creative as you. Love this shadow box, and I must say, your choice of Sailing Home is perfect to showcase. FABULOUS!!
Thanks so much, Linda! We had fun with it, and I’m grateful to Julie for helping me bring this idea to life. ♥
WOW and WOW! I love the project (you can’t go wrong with that bundle). I’ve already popped over to Julies’ great video and should be running upstairs at any minute to make my own version. Thanks to you and Julie for the inspiration.
Have fun with it! I messed up a couple of times before getting it right. You are better at 3-D than I am, so you might not encounter the same. 🙂 Thanks, Dianne! ♥
Love this great project, Brian. What a lovely gift it would be for anyone. I’m sure you and Julie had a great time getting this together for your local stamp club. Enjoy your weekend.
Isn’t it fun?! We had a good time pulling it together. ♥
I recently bought the Magnolia 3d embossing folder from you. I have the Big Shot and all accessories
I have not been able to get the folder to emboss using the sandwich that I have used before , that is in last year’s cataloG. It says to use a Specialty Plate. What is that?
Hi Nancy – with these new folders, you’ll need to build a “shim” with cardstock or the backing from DSP to make the sandwich a little thicker. The company is also selling a new adapter (not in the catalog) but available in the online store (https://www.stampinup.com/ecweb/product/149658/3d-embossing-folder-plate?dbwsdemoid=2104107). Since different machines have different pressure, you might be better suited to play around with layering first.
Love love love this project. You are so talented. I have a new grandson and we will use this to display his monthly pictures.
Such a great idea for this shadowbox! You’re going to love putting it together. Thanks for your kind comments, Dixie! ♥
Total wow project! Beautiful! You and Julie are fabulous!
♥ Thanks, Linda! It was fun to pull together.
Beautiful! I love them both! I have looked at both of these shadowboxes. Awesome! I was wondering, could you tell me the finished size of your shadowbox and what size did you cut your Seaside Spray and your strip of Night of Navy card stock to finish up your shadowbox. I would love to CASE them both! TFS Brian!
Thanks, Gloria! The frame is 4-1/2″ x 4-1/2″ from one side to the other (on the outside). The piece on the inside is about 3-1/2″ x 3-1/2″. So glad you like the project and hope you’ve given it a try. ♥