


Yesterday I shared a super-sweet birthday card I made with my local club over the weekend. While yesterday’s post was filled with pictures, measurements and enthralling stories about the project, I have more I want to share. So, I’m back today with a little bit more information about this fun card. Here’s a side view of the card I shared:
 If you would like to read my entire write-up about this card, please click here.
Here are some additional pointers and observations about the products I used to make this card…
A Perfect Frame
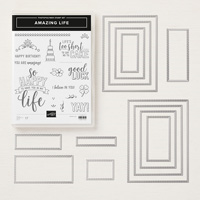
The Smoky Slate frame that showcases my sentiment and sweet cake is cropped with the Rectangle Stitched Framelits Dies. Because each of the rectangles in the set of dies is created with stitching on the inside and the outside of the cut line, you can layer all kinds of stitching on your projects. When I cropped this frame, I layered two of the dies on the cutting plate and ran it through the big shot. The stitching around the inside of the frame is from the larger of the two dies, and the stitching on the inside of the frame is from the smaller of the two dies. How cool is that?! The options are endless with these rectangle dies. Here’s a look at this must-have bundle:
 The Thick Whisper White panel that’s behind the frame is the same size as the largest rectangle on the frame (without the smaller cutout in the middle). You can just glue the two pieces together since they are the exact same size. I snipped mine a little to line it up in the frame, but that wasn’t
Get the Most Out of Your Builder Punch
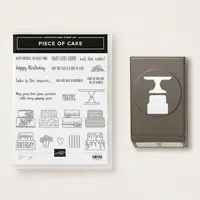
I love the Cake Builder Punch I used to crop out the sweet cake on this card. At my club over the weekend, I didn’t want everyone stamping and punching the two images (a pedestal and cake) separately, so I made the stamping more precise for the club members.
Here’s a look at the Piece of Cake Bundle:
 Don’t you love this set and this oh-so-fun builder punch?! Here nine easy steps to show how you can get the most out of a builder punch:
STEP 1 – Slide a piece of scrap cardstock into the builder punch:

STEP 2 – Punch out the images. How fun is that?!

STEP 3 – Place the scrap cardstock over another color of cardstock to create a contrast for the punched shapes. I used Flirty Flamingo.

STEP 4 – Carefully place the stamps over the cut out images. This is particularly easy with see-through photopolymer stamps.

STEP 5 – Place a clear block over the stamps and press down to secure them to the block. Gotcha!

STEP 6 – Ink up the stamps and stamp onto a clean piece of cardstock. Pay attention to where you stamp it along the edge of the cardstock so that it lines up with the punch.

STEP 7 – Admire your stamped image. You were paying attention and lined it up correctly along the edge of the cardstock.

STEP 8 – See how easily the images line up to punch them both at the same time. Smile at the genius of it all.

STEP 9 – Punch out the images. You are awesome!
 How fun is that?! Definitely makes it easier to (a) stamp and punch more quickly and (b) not waste so much paper.
Color Combination
If you love this sweet combination of Flirty Flamingo, Smoky Slate and Basic Black as much as I do, please save this for future inspiration:

Here’s another look at the final card I made (and shared yesterday):
 And here are the products I used to create it:
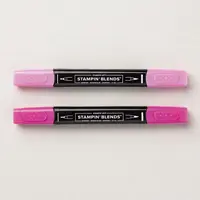
Bundles: Amazing Life, Piece of Cake Stamp Sets: Amazing Life, Piece of Cake Papers: All My Love Designer Series Paper, Flirty Flamingo, Smoky Slate, Thick Whisper White Inks: Memento Tuxedo Black, Stampin’ Blends (Flirty Flamingo, Smoky Slate, Lovely Lipstick) Accessories: Cake Builder Punch, Rectangle Stitched Framelits Dies, Pearl Basic Jewels, Stampin’ Dimensionals


Thanks for stopping by today! I hope you found these additional tips and observations helpful.
Brian

Occasions and Sale-a-Bration are LIVE
Stampin’ Up!’s Occasions Catalog and Sale-a-Bration event are live. That means there are tons of new, amazing products you need to check out and add to your wish list. To see the new catalog and start your list, click on the photos below:
 Placing an order today? Of course you are! If you are placing an order for $150 or more, I want you to enjoy all of the Host Rewards you have earned. If your order is less than $150, I’d love for you please add this Host Code – FW3NGFXF – when prompted. Thank you!


I loved this pretty card yesterday and even more today with all your great tips. These details are very helpful in making it easy to CASE. Thanks so much. Enjoy your day!
Yay! I’m so glad to hear it. Thanks so much, Hilda! ♥
Love your steps on using the punch. I hadn’t noticed the orientation.
There’s nothing more dramatic (and I’m being dramatic) than stamping an image and then finding you’ve stamped it upside down from the orientation of the punch – then you have to cut away at the other side and punch from that end…such a difficult life… Thanks, Mary!
Love the colors you’ve chosen! Of course I also like the off set piece on the front of the card – it makes it really special. AND the stitched rectangles – love them. Your tips using the punch are great. Thanks.
Yay! Thanks so much, Evelyn. I’m so glad you like the card – lots of great elements helped me to make a card I was happy to share.
Wow! That card was just jam packed with ideas, colors and technique tips. Good hints for the punch, thanks.
Thanks so much, Dianne! I had fun sharing this with club – all the techniques and products made it fun. ♥
Thanks for the tips Brian! You’re always so helpful. <3
That makes me so happy! Thanks, Dawn! ♥
Thanks for the punch tips! Will make life much easier!
Yay! I’m so glad you like them, Cathy!
Brian, normally I would have needed a video to understand the tips, however; I followed exactly what you were saying. Thanks for being so thorough. I’m sure this tip saved a lot of time and maybe paper. ??
Yay! I was thinking about making a quick video, but I ran out of time. Glad the pictures helped! Save that paper for something better. ♥
Great paper saving tip! Thanks Brian!
Happy to share, Sandra! Thanks! ♥
Oh my friend isn’t that the TRUTH,lol, I love your beautiful card, love how you used those new framletts, I got to get me some ♥️♥️♥️♥️♥️
Hugs Frenchie ♥️
Thanks, my friend! ♥
Genius!
🙂 Thanks, Vicki! <3