


With yesterday’s post, I shared a simple and elegant easel card. Easel cards have been all the rage for quite some time. They are really quite stunning when completed, and I’m not sure why every Christmas card isn’t REQUIRED to be an easel card – if I am going to put it on my mantle, then it should stand proudly on its own.
As promised yesterday, today I am sharing my step-by-step instructions. You may have seen them done a little differently, but this is how I do them:
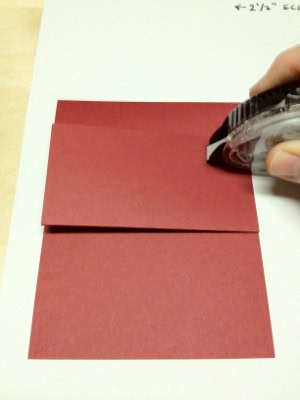
1. Cut a piece of card stock in half lengthwise (the new piece will be 4-1/4″ x 11″). Score at 2-1/2″ and 5-1/2″.

2. With the 2-1/2″ scoreline away from you, fold the cardstock toward you at the 5-1/2″ line.

3. Fold away from you at the 2-1/2″ scoreline.
 4. Add adhesive to the piece you just folded back. This is what will adhere to the back of the card base (a 4-1/4″ x 5-1/2″ base) in the next step. Depending on how heavy the card base is (if it’s multi-layered or has heavy pendants), you may have to use Sticky Strip here.
5. Place the card base over the folded piece of card stock, making sure you align it properly so that you are left with a 4-1/4″ x 5-1/2″ card. When the easel is complete, there will be about 1″ of card base at the top of the back that isn’t adhered to the flap. That’s good!

As with my card yesterday, make sure to include Stampin’ Dimensionals under the greeting or image on the inside of the card so that your card base will have something to “lock into” when it’s opened for show.
Here’s what I don’t get about easel cards: they are easy to make and easy to send, but they are pretty difficult to figure out if the recipient doesn’t know how to open it. I showed an easel card to several of my non-cardmaking friends, and I watched with amusement as they tried to figure it out. Do you put instructions in the card when you mail it? How do you know when they’ve figured it out?
Thanks for stopping by my blog today!
Brian
Do you like this project? Do you want to see more? Please subscribe to my blog by entering your email address in the “subscribe” field. You can buy Stampin’ Up! products from me 24/7 or join my team to earn discounts and benefits with Stampin’ Up! Please contact me at stampwithbrian@gmail.com if you have questions.


Ok Brian, I’m going to build an easel card, I’ve not made one is such a long time. I”ll upload it to you in an email as a thank you for your inspiration! Wish me luck!
That’d be awesome! Thanks, Patti!
I’ve never made an easel card! About time I tried it, don’t you think? Thanks for the directions!
I think you should do it, and I know you can do it. They really are fun and a wow to folks who have never seen one.
Brian, you never change directions unless there is a good reason. So, why do you allow 1″ across the top of the cardbase to be unadhered? Does the easel balance better? And, yes, I too have watched people try to “figure out” the card. Once shown, they ooh and aww!
You make a good point, Katy. I know there are other methods for constructing an easel card, but I find this method works best for me. The card almost springs open, and it stands up really straight when mounted. All the better to display your card on my mantle!
And here I was waiting for a really big tip…. LOL!
I failed to mention how much I appreciated both the beautiful design as well as the instructions…. love your blog, Brian!
Nope! “It’s bouncy and stands up straight” is all you’re getting. 🙂
Thanks, Katy! I’m glad you like it.
I am new to your blog, and I have to say that I love your tips and tricks….thank you for sharing all that you do…..!
Thank you, Carol! I love to share, so it’s nice to know folks are being receptive if it. I really appreciate your feedback.