


FREE Shipping Reminder
Wow! What a weekend! Stampin’ Up!’s FREE SHIPPING ON EVERYTHING promotion has caused quite a frenzy. Did you miss out? Good news – you still have today to get FREE SHIPPING on every purchase (whether you need a couple of small things or want to place a hostess party order, shipping is free!). Did you place an order over the weekend but just remembered you forgot something – order it today. Please click on the image below to place your order now – or send me an email at stampwithbrian@gmail.com.
Faux Wood Video Tutorial
This week The Paper Players challenge us to make project with recycled or repurposed elements. I made this card using the cover paper from my Print Poetry Paper Stack: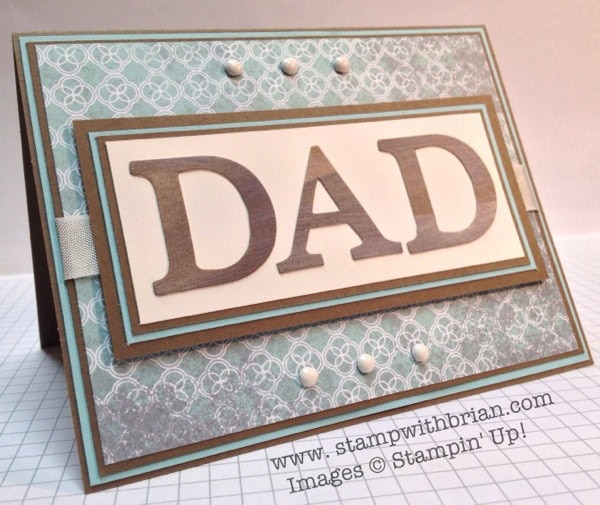
Today, I want to share a video tutorial that walk you step-by-step through the process of making your cardstock look like wood. I was amazed at how easy this is and how lifelike it looks. When I found a tutorial on Splitcoast Stampers, I questioned whether it would work like I wanted. Boy, did it ever! Here’s my take on this faux wood technique:
Thanks so much for stopping by my blog today. Let me know what you think! I hope you will give it a try!
Brian

Brian


I use the back cards ,etc off packs of DSP and other items all the time …so I will pull some today to try this …question ? doesn`t pulling your white craft pad over another color especially brown contaminate it ? I like the idea and want to try it …this would probably look good using the woodgrain folder also . Good video …. !
It didn’t contaminate the white pad the FIRST time I did this because I let the ink dry overnight. If you look closely in this video, the white pad has brown ink along the edge I dragged across the paper because it wasn’t dry. When I was done, I dabbed that area with a paper towel and then added some white craft reinker to clean it up. If I were to do this again, I might consider sponging the white on (you just need a little bit).
Thank you …I was thinking about sponges also …it merits some trying because the look is neat and I want to try it .
“Crank, crank, crank … snip, snip, snip … glue, glue, glue… And here’s what I made!”
Love it, Brian!
I loved that part as well.
Me to!
Me tooooo! So funny. Great tutorial Brian. I loved it! I also loved the fact that you addressed that it’s not going to look like wood until you cut it out. Sometimes I’ll get partway through a new technique and then bail because it doesn’t seem to be working right… 🙂
Me, too! It was “SO Brian” 😉
Oh Brian, I love this technique, it does look like wood once you cut it out. Your video is fabulous, great sound effects, my dear. Like Sonny, I was also wondering if your white ink pad was messed up, it looks like it was. Glad you were able to clean it up, so maybe using a sponge would be better or either drying it quickly with a heat gun or overnight.
Great card, by the way!!
Brian, I just love your personality and love seeing it shine not only in your blog posts but your videos too. “Crank, crank, crank… snip, snip, snip… glue, glue, glue…” and of course the little winkie face 😉
Great video and cool technique! Can’t wait to try it!
I love this technique…a great idea to use your cardboard cover for it! Terrific take on the challenge—your card is genuinely awesome!!!!
Now I know your secret on how you create you cards so fast….crankX3 snipX3 glueX3. Luv it! A must try for sure. I bet this technique and using the woodgrain embossing folder would look fab also.
Okay Brian….it’s been forever since I dropped you a comment….but your video today deserved a HUGE COMMENT. You CRACK ME UP! Love that you not only didn’t “bore us” with showing us the construction of your card….but you gave us some AMAZING sound-effects to keep us entertained while you were building your card. TOO FUNNY FRIEND! Thanks for sharing this great technique with us today (hope you have a second white stamp-pad)!
Brian – you are a rip! LOL
Oh what fun – great technique. Your tutorial is excellent, Brian. And ! love the card – will definitely be making this today! Cheers!
Enjoyed your video — wonderful technique to try. I will see is if I can snip, snip, crank, crank, glue, glue and come up with a great card as you did. Thanks you put a smile on my face to start my week.
Sharon – I hope you haven’t started your project yet! If not, please note that it’s “crank, crank, crank, snip, snip, snip, glue, glue, glue”. If you glue before you snip, you’ll have a mess on your hands. 🙂 🙂 🙂
What a very cool technique! Thanks for the vid!
Great job on the vIdeo! Stunning card! Wonderful YOU!
I love your ideas and cards! Just thought I’d answer the question, When is it appropriate to use a pig on a card? NEVER with a female. Period.
Ok, I had to watch the video, again, before I start crafting … as noted in a previous comment, it is important to get your sound effects in order, too, or your card won’t turn out! Who knew? 😉
If you made your video recently, I must say that you sound well and your card is super! Hope you are feeling better! Nancy B
Wonderful video…the best part are the sound effects off to the side…you are so funny! Yes, when cut out to make your letters, it does look like wood…and of course I think we are all cautioned to let each layer of ink dry, especially before using the Craft White…. Thank you for sharing a great technique with us!