


As if you didn’t already know, I’m totally in love with Stampin’ Up!’s 2017 Holiday Catalog. I am counting down the days until this catalog is released on September 1. Today’s super-sweet treat bag features three new products from this new catalog. They aren’t all part of the same suite in the catalog, but I absolutely love them together. Here’s my oh-so-adorable Halloween treat bag:

How sweet is that? Perfect for a candy bar or a handful of treats. I cropped this bag with the Mini Treat Bag Thinlits Dies and decorated it with some fun, new products from the Holiday Catalog.
Tips, Tricks and Reminders
- Three Newbies. This project features three new products from the upcoming Holiday Catalog. Here’s a look at all three:
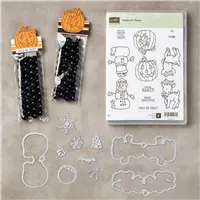
- Seasonal Chums Bundle. If you are a fan of the A Little Wild Bundle (the little elephant, lion and bear tags in the Annual Catalog), then you’ll be thrilled with the new Seasonal Chums Bundle. A snowman, a jack-o-lantern and a reindeer – so cute! And lots of great little sentiments. Here’s a look at this super-fun bundle:

Seasonal Chums Bundle, Stampin’ Up!
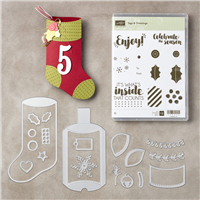
- Tags & Trimmings. My eyeballs about popped out of my head when I first saw this stamp set on Stampin’ Up!’s incentive trip in July. I LOVE these sentiments and the beautiful, modern fonts. My little treat bag certainly isn’t a Christmas bag, but this sentiment works well here. Here’s a look at this amazing stamp set:

Tags & Trimmings, Stampin’ Up!
- Spooky Night Designer Series Paper. There are some fun and spooky images on the Spooky Night Designer Series Paper. I chose this fun pattern of Halloween greetings for the base of my fun bag – it’s such a fun pattern for kids of all ages. Here’s a look at this spooky, new paper:

Spooky Night Designer Series Paper, Stampin’ Up!
- Seasonal Chums Bundle. If you are a fan of the A Little Wild Bundle (the little elephant, lion and bear tags in the Annual Catalog), then you’ll be thrilled with the new Seasonal Chums Bundle. A snowman, a jack-o-lantern and a reindeer – so cute! And lots of great little sentiments. Here’s a look at this super-fun bundle:
- Watercolored Pumpkin. I was determined to use this set as the tag it’s designed to be. I love the concept of the tags. After I stamped the pumpkin images, cropped them and carefully watercolored them, I decided the backside of the tag was too sweet to not showcase. As such, I separated the two and used them for two project – one today and one tomorrow. 🙂 I stamped the image with Archival Basic Black ink on Thick Whisper White and let it dry. I then colored the images with ink and an Aqua Painter.

- Touch of Gray. This page of Spooky Night Designer Series Paper features Pumpkin Pie and Very Vanilla (although it’s not listed, I’m convinced that the words on the page used for this bag are in a mix of Very Vanilla and Whisper White). The opposite side that peeks out of the top of the bag also showcases Basic Black and Cajun Craze. What a great combination! Since I watercolored my jack-o-lantern’s eyeholes, nosehole and mouthhole in Smoky Slate, I added a thin layer of Smoky Slate to the borders. That little addition makes all the difference to pull in the gray from the sweet image.

Stamp Sets: Seasonal Chums, Tags & Trimmings Papers: Spooky Night Designer Series Paper, Basic Black, Smoky Slate, Whisper White, Thick Whisper White Inks: Archival Basic Balck, Pumpkin Pie, Smoky Slate, Old Olive Accessories: Mini Treat Bag Thinlits, Tear & Tape, Stampin’ Dimensionals


Tomorrow! I hope you’ll come back tomorrow to see my second project with this stamp set (the other side of the pumpkin). It’s very different from today’s project.
Thanks for stopping by today!
Brian

Stampin’ Up! has restocked the Clearance Rack with lots of new items – all marked way down! These are “while supplies last” deals, so you’ll want to get your order in soon. 🙂 Click below to see what’s left – you won’t be disappointed.
![]()
![]() JOIN US. Registration for World Card Making Day 2017 will be closed soon. If you’d like more information or want to register (it’s such a wonderful event!), then please CLICK HERE.
JOIN US. Registration for World Card Making Day 2017 will be closed soon. If you’d like more information or want to register (it’s such a wonderful event!), then please CLICK HERE.


Hello Brian,
Love the gray idea. It makes a difference .
Have a great day.
Thanks, Lesa! I knew I needed to add another color and wasn’t sure what color it would be – until I colored in the holes in the pumpkin. That’s when I knew Smoky Slate would be perfect! I appreciate your comment.
Very cute! I reallly like the pumpkin water colored, and the touch of gray is perfect! Can’t wait to see tomorrow’s project!
Thanks, Carrie! He’s such a sweet image, right? Thanks for your kind comment – can’t wait for you to see tomorrow’s project. It’s completely different.
Love how you colored the jack-o-lantern. Can’t beat Aqua Painters!
Thanks, Dianne! I don’t watercolor a lot, but I found it rather easy here.
So crisp against that black background. Such a sweet pumpkin (soft color with the Aqua Painter) and a treat inside would bring an instant smile!
Thanks, Mary! These little bags are adorable and will look even better when stuffed with treats for children (or friends) in October.
I love that DSP! Using the thin backing of Smoky Slate is absolutely perfect. It seems to pull the entire design together. I think the adult Trick or Treaters would love these treat bags as much as the kids would. I send my great great nieces and nephews some money for Halloween and this little treat bag would be the perfect thing to tuck a few dollars into. Love it.
I think that would be a wonderful way to wrap up your gift, Grace! Thanks for your wonderful feedback about my project. I appreciate it!
It must be my day to go “Aaahhh, so cute”. Brian what an adorable little treat bag. Makes me wonder if you make a bunch in anticipation of Halloween. Love that dsp. Great job
Thanks, Robbye! I’ll likely be making some of these for my coworkers. We haven’t had one trick-or-treater in the 5 years we’ve lived here. Thanks for your comment!