


Yesterday I shared a sweet treats idea I’ve been holding on to for a while. You can read yesterday’s post here. I love the Love You to Pieces Bundle in Stampin’ Up!’s 2018 Annual Catalog, and I love Reece’s Pieces – it was natural for my mind to connect the two together. Today I’m sharing some more tips about how to create these fun treats and some of the techniques I used to create them. First, let’s take a closer look at the individual projects.
A Closer Look at the Two Projects
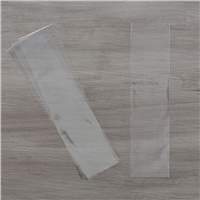
Here’s a closer look at the cello bag and bag topper: I used a 2″ x 8″ cello bag for this project. To make the candy bag a little more compact, I cropped the long bag at 6″. With a 2″ x 4″ topper (scored at 2″), I was left with about 4″ of Reese’s Pieces to fill the bag – that felt like the right amount and left more Reese’s Pieces for me.
HELPFUL HINT: If you plan to cut your bag down (I cut mine on my Stampin’ Trimmer), be sure to cut the side of the bag that’s already open – otherwise, you end up with a tube. Please don’t ask how I learned that super-fun lesson. <3
Here’s a closer look at the Clear Tiny Treat Box and topper:
 The topper on this treat box is the same as the topper on the cello bag. I wrapped a thin band of Pineapple Punch cardstock around the box and then folded it over to create a small flap for the topper. It’s the same process I used to create these wraps on Valentine’s Day favors. So easy, so fun!
Assembling Your Puzzle Pieces
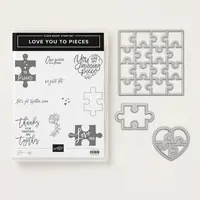
These Love You to Pieces toppers, cropped with the Puzzle Pieces Thinlits Dies, are adorable – and they destined to be pieced together on a project. There are many ways you can connect the two pieces together before adding them to a project.  Here are two ways I played with:
- I brought gift wrap tape with me to club. A small strip of tape hold the pieces together (on the back) perfectly. We then added Stampin’ Dimensionals to mount them to the 2″ x 4″ (scored at 2″) bag topper.
- For one of my samples, I punched a 3/4″ circle of cardstock and glued it behind the two pieces to hold them together.
Heat Embossing Tips
I love to heat emboss with White Stampin’ Emboss Powder. When using White powder, I always reach for my Whisper White Craft Ink to stamp the image before pouring the embossing powder over it.
I also have a metal lid from a big tin of shortbread cookies that I use for heat embossing. I brought it with me to club. Here’s Marti (with her big, fancy ring), heating two of the puzzle pieces.
 Why do I heat emboss on a metal tray? Here are some pointers and explanations:
- While my Heat Tool is heating up, I run it along the back side of the lid to start heating the paper from the other side. When I heat both sides of the cardstock, I find that it doesn’t warp like it does when I heat only the front.
- The metal lid allows me to hold the cardstock with a magnet so that I don’t burn my fingers while heat embossing.
- I can flip the lid around in the light to best see when the embossing powder is melting.
- Shortbread cookies are delicious – any reason to buy a tin of shortbreads, right?
Bundles: Love You to Pieces Stamp Sets: Love You to Pieces Papers: Pineapple Punch, Pumpkin Pie, Early Espresso Inks: Whisper White Craft Accessories: 2″ x 8″ Cellophane Bags, Clear Tiny Treat Boxes, Puzzle Pieces Thinlits Dies, White Stampin’ Emboss Powder, Heat Tool, Stampin’ Dimensionals


I hope you find these tips helpful!
Thanks for stopping by today!
Brian

August Promotions
Stampin’ Up! is hosting two amazing promotions in August.
For every $50 you spend on an order in August, you will earn a $5 coupon to be redeemed in September. How fun is that? To learn more, click on the image below:
 I’m also excited about Stampin’ Up!’s Limited-Time Release (through August 31 or while supplies last) of Color Your Season products. Click below to read more about these wonderful, new products:


Thank so much for the details Brian, the tin for embossing is a very cool idea. AND, I’ve been known to cut a tube or two when cutting down my cello bags ?
Glad you like it, Katrina! I’ve held on to this lid for quite some time. 🙂
Let’s hear it for tube cutting! <3
And this is why I read your blog everyday! I’ve been using a shoebox lid for heat embossing to keep my fingers from burning but sometimes the paper pieces fly right out which is rarely good. You are brilliant! And I’ve already got a shortbread tin around here somewhere…maybe I’ll just buy another one….??
So happy to help, Barbara. I don’t want your finger tips to burn. I agree that you should just go get another tin of cookies – just in case you don’t really have one. <3
Love the idea with embossing with a tin lid! Thanks for sharing, Brian!
Thanks for your comment, Angie! I’m so glad you like the tip. It has helped me lots over the years. <3
Thanks for the GREAT tip about using a tin lid for embossing, Brian!
You’re welcome, Dawn! I find it so helpful! <3
I never thought to use a metal tray and magnets to aid with heat embossing. I usually just flip the paper over and over to help warping while toasting my fingers.Genius!
I may go get a small sheet tray from the dollar store and try this out ( while I do enjoy cookies, I’m trying to do a little better in my snacking habits)
Thanks, Nina! I’m happy to say I haven’t purchased a tin of cookies in quite some time. A metal sheet from the dollar store is likely a cheaper option, too. <3
Thank you so much for sharing you creations and your tips. I love the metal tin idea.
I’m so happy to share, Cyndi. Thank you for the feedback. <3
I really need to try your trick of using Whisper White craft ink vs. VersaMark. Brilliant and I covet both these projects to “pieces!”
Thanks, Mary! The only downside of the ink – it’s messy. The cleanup is worth it, though, for a crisp and solid image. <3
Ooooh, my Friend, I love it and it looks yummy too, I like the idea about the cookie lid , I warped my pad with the heart gun ?
Tfs my friend ,
Hugs Frenchie ♥️
Thanks, Frenchie! I don’t want you to burn your fingers, so PLEASE find you a metal tray. <3
Like many others I too am thankful for the cookie tin lid idea. Normally I use a clothes pin to hold what I am embossing but every once in a while it leaves it’s imprint on the card stock. I have some gorgeous tins I have saved over the years Brian. Does using the heat tool have any affect on the front of the lid? I have the Love You To Pieces set on my wish list. I just think it would be tons of fun to use.
Thanks, Grace! The heat embossing hasn’t affected the front of the lid I use – can’t promise other lids will hold up as well. I hope you’ll give it a try! <3
What a fantastic idea to use a tin top for heat embossing! ! I will definitely use one the next time I emboss. Thanks for the tip!
Your finger tips thank you, Sheila! <3 Thanks for your comment.
These are really good tip that I had never heard before. Thanks so much for sharing.
I’m so happy you like it, Gloria! I’ve been using this lid for years – hope you’ll give it a try.
ditto on the tin comments! great idea, also using the white ink, gotta give it a try. Thank you for the tips!
Yay! I’m so glad you like the tips, Lynne! They are simple ideas that make a big difference. <3
Thank you for this great tip. I also agree with you shortbread is sooo good .
🙂 Thanks so much, MargaretAnn! So glad you like the tip – and the cookies.
Good Morning Brian, a day late . . . love this gift item. So cute. Love your many tips too.
Thanks a bunch.
🙂
🙂 Thanks so much, Nancy! I’m so glad you like the project and tips. <3
I’m always in the mood for shortbread cookies and stamping tips from you. These are tots adorbs and I know just who I’ll be gifting them to.
I knew these tips would appeal to you – cookies and stamping are always a great thing. Thanks, Robbye! <3
Wow a metal lid…..who knew? You did! This is an adorable project,
I mentioned the lid in a post four or five years ago. How is it that everyone missed that post. 🙂 Thanks, Linda! <3