


For this week’s CAS(E) This Sketch challenge, I broke in one of the new dies from Stampin’ Up!’s 2019 Occasions Catalog. The Be Mine Stitched Framelits Dies are an amazing collection of hearts that are perfect for Valentine’s Day and beyond. I let this lacy and lovely heart take center stage on my card. Here’s my card:
 And here’s the banner for the challenge that inspired my card (this challenge goes live at 10am EST):
 Tips, Tricks and Reminders
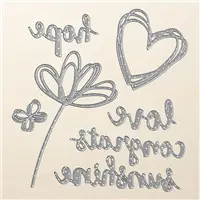
- Be Mine. While the sketch calls for a band across the card front with a big, bold sentiment, it’s the lacy heart that sets the tone and color mood for my card. I’m in love with the collection of hearts in the Be Mine Stitched Framelits Dies in Stampin’ Up!’s 2019 Occasions Catalog. Just in time for Valentine’s Day – but perfect for weddings, anniversaries or any other occasions that celebrate love. Just look at the variety of hearts in this collection:
 Confession time – I really wanted to make my card with the band of hearts in the lower, right of the picture above. I have a great idea for this band of hearts that I’ll complete and share sometime soon. This card, though, showcases the lacy heart in the top, center – I kept coming back to it, so I had to go with it.
 - Layering Love. Who doesn’t love love? The Mossy Meadow “love” is cropped from the Sunshine Wishes Thinlits Dies and layered over the Blushing Bride heart from the Be Mine Framelits Dies. Both are glued down with Tombow Multipurpose Liquid Glue. I cropped the band across my card to make sure that the heart could hang over the edges of the band. The pink heart pops against the white band and blends into the Crumb Cake. The sentiment pops above them both. I was really happy with how this layering worked out.
 The pink heart also pops against the Blushing Bride layer along the base of the card. I added texture to that panel with my all-time favorite embossing folder – the Subtle Dynamic Textured Impressions Folder. <3
 - A Gorgeous Trio. I’m so happy Mossy Meadow made its way back into our color collection this year. I missed it while it was gone and am so happy to be able to play with it again. I’ve used this combination of Crumb Cake, Blushing Bride and Mossy Meadow before – and I’ll use it again. The combination makes me so happy. If you like this mix of Crumb Cake, Blushing Bride and Mossy Meadow, please save this:


Papers: Crumb Cake, Blushing Bride, Mossy Meadow, Whisper White Accessories: Be Mine Stitched Framelits Dies, Sunshine Wishes Thinlits Dies, Subtle Dynamic Textured Impressions Embossing Folder, Stampin’ Dimensionals


I hope you’ll pop over to the CAS(E) This Sketch site to see the cards by the design team members and to play along with this week’s challenge.
Thanks for stopping by today!
Brian

Year-End Closeout & Other Information
Stampin’ Up! kicked off the Year-End Closeout yesterday! If you want to read more about the sale and retiring items, please CLICK HERE. If you are ready to peruse the list of retiring items (these items will only be available while supplies last), the click on the link below to see the items in my online store:

Holiday One-for-One Swap
 I love sharing the cards I received during the Holiday One-for-One Card Swap I hosted last month. We’ve taken a short break from the cards to share the Year-End Closeout and today’s CAS(E) This Sketch project, but we’re back at it tomorrow. If you have missed the other days, CLICK HERE to work your way through all of the ones I’ve already shared.
 Placing an order today? Of course you are! If you are placing an order for $150 or more, I want you to enjoy all of the Host Rewards you have earned. If your order is less than $150, I’d love for you please add this Host Code – 99E3ANSH – when prompted. Thank you!


A surprising color combination that looks so lovely Brian! And the layers…. : )
Thanks so much, Dawn! I really appreciate your sweet comments.
Two words…Simply Sweet!
Two words…thanks, friend! <3
Beautiful card…love how you paired some Mossy in there!
Thanks, Windy! I’m a big Mossy Meadow fan. <3
Simple, romantic with a lovely color combination. Your layers are always creative magic!
Thanks so much, Mary! I can’t NOT make layers. <3
I didn’t “need” this set of dies until I saw your card!* Such an effective representation of the sketch, too. AND the mossy meadow keeps the card from being kitschy and eliminates any Lilly Pulitzer-ness. (That’s a good thing to me) Anyway, Bravo, and as always, hugely impressed by your design aesthetic. *Shopping list updated!!
Thanks so much, Linda! I’m so happy you like what I did with this card – definitely didn’t want it to be kitschy, so score! <3 You'll love these dies. <3
What an adorably sweet card, Brian! Love that heart diecut! Enjoy your day.
Thanks so much, Hilda! The die is wonderful – so glad you like the card. <3
Love this card Brian and that lacy heart is absolutely awesome! Mossy Meadow is my favorite of all the greens and paired with the Blushing Bride and Crumb Cake the card is both soft and striking all at the same time. As always, a fantastic job.
Thanks so much, Grace! I’m so glad you like the card – you are 100% right about the lacy heart and Mossy Meadow. Both are incredible. Glad you like the color combo, too. <3
What a “love”ly card. I’m excited to be able to plays with the Be Mine Framelits soon, too. I have some great inspiration now.
🙂 Thanks so much, Dianne! You’re going to love these dies – so versatile and fun.
The colors, the textures, the new framelits! Love this card!
Thanks, Cindie! There are so many great options in these new dies! <3
I’m in awe at your impeccable layering Brian, I want to guess the edges are like 1/8th” maybe? Just stunning and perfect in every way.
I love the white background for that amazing lacy heart, the sentiment going across in Mossy Meadow really stands out.
Another winning color combination on an absolutely lovely card.
Thank you for sharing.
XO
Thanks so much, Maria! Yes, the borders on my cards are generally 1/8″ wider or longer than the layer they are framing. As such, the border is actually 1/16″ all the way around. Thanks for your sweet comments! <3
Oh you enabler you…..this is so sweet….you made me order the framelits!
Yay! You’ll be so happy with them, Linda! Promise! <3