


I gave a gift to a wonderful friend last week and needed a sweet tag to go with it. I didn’t have a lot of time, but I wanted something special. That’s when I reached for my Well Written Framelits Dies and a trio of flowers from Petal Palette. When Mom was here last, she colored a handful of flowers for me, so I had a great starting point for my tag. Here’s the tag I made:
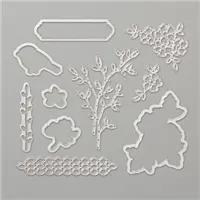
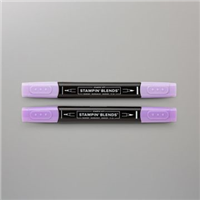
 The flowers are colored with Highland Heather and Soft Sea Foam Stampin’ Blends and cropped with the Petals & More Framelits Dies. So sweet, right?
The base of my tag is Thick Whisper White cropped from the Rectangle Stitched Framelits Dies. I used the Well Written Framelits Dies to crop out the “thanks” and used the Multipurpose Adhesive Sheets to adhere the sentiment to the tag. Since several customers have expressed that they aren’t sure how to use these sheets, I am going to walk you through it one step at a time.
Before I share my step-by-step tutorial for using Multipurpose Adhesive Sheets, here’s a look at the product:
 Each pack comes with 12 sheets (12″ x 6″ each) – that’s 864 square inches of adhesive sheets to play with! 🙂
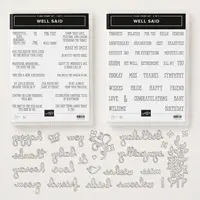
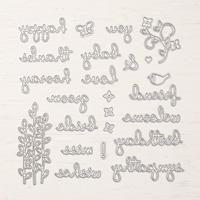
And here’s a look at the must-have Well Said Bundle that includes the Well Written Framelits Dies:

How to Use Multipurpose Adhesive Sheets
Here’s how I used Multipurpose Adhesive Sheets to make this easy tag even easier.
I started with a fresh sheet of Highland Heather cardstock (no need to start with a full sheet, but I had no scraps):
 I set my die on my Multipurpose Adhesive Sheets to cut a piece just big enough for my die. The sheets are made of a million (estimated) little glue dots pressed between two peel-able sheets:
  I removed one side from the adhesive sheet and stuck it to my piece of Highland Heather cardstock:
  I cut around the adhesive sheet, flipped it over, placed the tie on top and then ran it through my Big Shot on my dirty-looking-but-still-so-functional cutting plate (the adhesive sheet is attached to the cardstock between the cardstock and cutting plate):
  The “thanks” just peeled right out of the piece of Highland Heather (and has adhesive dots and thin layer of adhesive sheet on the other side):
  I peeled the adhesive sheet from the back of the sentiment, leaving the tiny adhesive dots behind the thin cutout:
  I carefully pressed the cropped die against a piece of Thick Whisper White:
 I cropped the sentiment with a Rectangle Stitched Framelits Die:
  How easy is that?! Now that you know what these Multipurpose Adhesive Sheets can do, how have you lived this long without them? Not only do they work well with a variety of dies and punches, but they make the Well Written Framelits Dies a must-have.
In Summary
Here’s another look at this adorable tag I shared with you today:
I’d love for you to save this process and share it with your stamping friends. Here’s a graphic you can save or add to Pinterest for future reference:
 Here are the products I used in today’s project:
Stamps: Petal Palette Papers: Highland Heather, Thick Whisper White Inks: Memento Tuxedo Black, Stampin’ Blends (Highland Heather, Soft Sea Foam) Accessories: Petals & More Thinlits Dies, Well Written Framelits Dies, Rectangle Stitched Framelits Dies


Thanks for stopping by today! I hope you enjoyed my post about the Multipurpose Adhesive Sheets. ♥
Brian

Spring Product Shares – Limited Time Only
Spring is just around the corner! I want you to be ready with all the papers, ribbons and embellishments you need to make your Spring projects. As such, this weekend I announced that I’m hosting Spring Product Shares. I’d love for you to join in – click on the image below for all the information: I’m only offering these for a short while, so sign up today! ♥
 Placing an order today? Of course you are! If you are placing an order for $150 or more, I want you to enjoy all of the Host Rewards you have earned. If your order is less than $150, I’d love for you please add this Host Code – BX3GMCHV – when prompted. Thank you!


THANK YOU! The instructions on the dizziness paper was great! I was doing it backwards!
That’s a common mistake – and makes the process frustrating. Glad you found it helpful! ♥
I love your little tag Brian! Got me thinking of an idea for April OnStage Swaps…..hmmmmm. 🙂
How fun! Thanks, Judy! I hope you’ll share with me what you make.
Cute tag! Love Mom’s coloring. Great tip about the adhesive sheets. They are a great tool that I need to remember “before” I diecut words. Enjoy your day!
She’s pretty talented. 🙂 Thanks, Hilda! Every time I cut a sentiment WITHOUT the Adhesive Sheet, I wonder why I’ve not used it. Hope your day is great!
Thanks for the great play by play Brian. Sweet tag…love our new purples!
Happy to share, Dawn! Thanks!
AWESOME tips on using the adhesive sheets (they can be tricky to figure out). LOVE your Mom’s coloring skills…..Please let her know that if she get’s bored……I have stacks of coloring I can send her to keep her busy (just saying!).
She might just be sitting around her house now, wishing she had stacks of things to color. I’ll reach out immediately, Kadie! ♥ Thanks!
Great directions ! I forget about the adhesive sheets ! I need to cut up some squares and put them close by my Big Shot ! Also I think I will make up an assortment of pre stamped and precut sentiments just for those time crunch times . I like your mom`s flower idea also !!
This was a fun visit ! Thank you !!
Such a great idea to keep pieces by the Big Shot. Stealing that idea and running with it! Thanks, Sonny! ♥
Thanks so much Brian for the lesson using the adhesive sheets. I have used them for a while but put an entire sheet on the card stock and ended up with a lot of wasting so I stopped using them. Now I can take them back out and know most of the sheet won’t be thrown away. I printed out your tutorial and have it right with the adhesive sheets. You ARE the best!
Yay! So happy that my step-by-steps helps, Grace! This is the best way to get the most out of these adhesive sheets. Glad you found it helpful. ♥
Awesome instructions with great photos! Thanks- I have it and never use but need to.
They are pretty wonderful, Windy! You’ll enjoy playing with them.
thank you Brian, I can’t tell you how many times the adhesive was on the wrong side! (lots) I always forget in between uses, then ene up layering so it isn’t wasted.
Been there, done that. It’s such a great tool – the more we use it, the easier it gets. 🙂
Thanks for sharing your technique; much appreciated.
So happy to share. When I find something helpful, I have to believe others will, too. ♥
Fabulous demonstration, Brian! Love that you cut the adhesive sheet into a smaller rectangle. Helpful hint!!
Thanks, Peggy! Just trying to get the most out of these sheet. 🙂 So glad you like the tips. ♥
Great tips for using the Adhesive Sheets. Love the tag. Nice collaboration with your and Mom!
🙂 Thanks, Dianne! Having the colored trio of flowers made the assembly quick and easy.
Love these tips and hoping I use my sheets more!
Thanks, Mary! ♥
I can’t thank you enough for the “Well Written” (pun intended) explanation for using the adhesive sheets. I bought that bundle and love it, but really struggled with trying to remember which side of the adhesive sheet to place my cardstock and die on. I wasted several pieces, but love that I now have your great simplistic directions! I think I will actually crop the directions and put them right in with my dies, and even with my adhesive sheets. Thanks so much!
SO happy to share, Carole – especially if it makes it easier to use the dies. ♥ Thanks for your comments.
Brian thanks so much for this great step-by-step example. The first time I used the adhesive I die cut it backwards, so each time I used it I had to really stop a visualize which way was correct. Now I have a print out to save my brain for other things that don’t come easy ?. Great job on the details.
So happy to share, Katrina! I have to think through the whole thing every time I use it, too! Ha! ♥