


Last week I shared some little boxes I made for an all-day working session I hosted for my team at work using the Tricks & Treats Dies (you can see that post here). I tucked little chocolates inside the boxes and set them around the room to greet my team members when they came into the room. They aren’t stampers (they are accountants), so it was easy to impress them. 🙂
The night before the meeting, I decided to add each team member’s first initial to a little kraft notebook I had left over from another project. I matched each letter with the color of the coordinating box. Here’s a look at three of the notebooks and coordinating boxes:
 They were happy with the boxes and sweet treats inside, but they were all thrilled with their personalized notebooks. Here’s a closer look at two of the pairings:

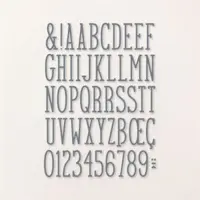
 Each of the letters on the small notebooks were cropped with the Alphabet a la Mode Dies – such a great collection of classic letters in a classic font. Here’s a look at the must-have Alphabet a la Mode Dies:
 The intricate dies wouldn’t be nearly as adorable on the notebooks if they pealed away at the edges or were easily ripped off the notebooks, but those letters are held tightly in place with Adhesive Sheets. I love these things! If you’ve never used them before, you should give them a try! Here’s a look at the Adhesive Sheets:
 One side of each Adhesive Sheet is filled with tiny, tiny dots of glue to give you full coverage on intricate dies. Here’s a quick summary of how to use the Adhesive Sheets:
- Cut a piece of cardstock to die-cut size (e.g., just a little bigger than the die you want to cut).
- Cut a piece of Adhesive Sheet to the same size.
- Peal off one side of the Adhesive Sheet you just cut and stick the cardstock to the sticky side of the sheet.
- Run the cardstock/adhesive combo through the Stampin’ Cut & Emboss Machine with a die (the cardstock facing up and adhesive side facing down).
- Remove the die-cut piece and poke out leftover pieces.
- Carefully peal off the Adhesive Sheet backing that remains.
- Stick the die cut-out on your project.
I use my tweezers to handle the die-cut pieces with Adhesive Sheet backings to ensure I get proper placement.
Accessories: Alphabet a la Mode Dies, Adhesive Sheets

Thanks for stopping by today!
Brian

Join My Team with an Incredible Join Promotion
Stampin’ Up! is hosting an incredible join promotion in the month of October – you can choose 35% off your Starter Kit or earn 35% more product with your normally-priced Starter Kit when you join in October. I’d love for you to be a part of my InKing Royalty group!
To learn more, click on the banner below:

 Placing an order today? Of course you are! If you are placing an order for $150 or more, I want you to enjoy all of the Host Rewards you have earned. If your order is less than $150, I’d love for you please add this Host Code – MS3GP3AU – when prompted. Thank you!


Wow! That is so classy and personalized with the bold letter. Diggin’ the box, too.
These are so “cool”, Brian! But then, you are, most likely, the best boss there! ⭐️ 💫 ⭐️
The little notebooks are a very nice addition to the box of candies. Love this alphabet font and size and it includes numbers. Enjoy your day!
Okay ! I am liking the INITIAL idea ! That is fun and easy ! Now I know why I need these dies .
Agree with Suzie on you being a super boss !!
Not “just accountants” are impressed with your talent and creativity. We stampers are, too. And as Suzanne said, you are likely the best boss in town! TFS
These are adorable!
I want to come work w/ you! I’m not bad w/ numbers and I love to stamp- we’d be great co-workers!
I actually just used those dies on bags I had for my class participants at a stamp session yesterday (the focal decoration on the bag was made using the Earthen Elegance bundle), but I added each person’s name at the bottom using the Alphabet a la mode dies.
And I 1000% agree w/ using the adhesive sheets! Before Stampin Up had then, I tried a few other brands and wasn’t always sold on them, but the backing peels so much easier and they are easier to cut to size using Stampin Up’s.
Thanks for sharing!
Love the boxes…great idea!
Brian,
I love your project! I will be making the box and notebook for a gathering that I’ve planned. They are very “classy “. Thank you!