


In my first stamping life (years and years ago), one of my favorite stamping techniques (and also one of the most labor-intensive) was called Cracked Glass. I made necklace charms, refrigerator magnets and special card fronts using this technique. I forgot all about it until I came across one of Mary Fish’s video tutorials from 2008. My mind started racing about how I could revive this really cool technique – I knew right away I wanted to use my Ornament Keepsakes stamp set. Here’s my card: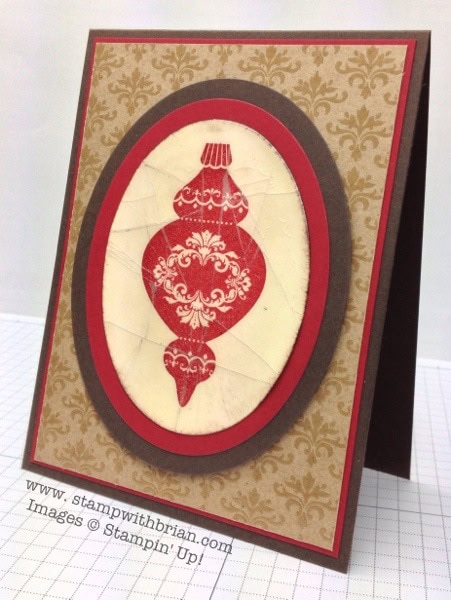
Cracked Glass – a Quick and Easy Tutorial
Here’s how I created this antique look of cracked glass:
- I stamped the ornament with Cherry Cobbler ink on Very Vanilla card stock.
- I cropped the ornament with Ovals Collection Framelits.
- I used a sponge to brush the edges of the oval with Early Espresso ink.
- I embossed the entire front of the oval with clear embossing powder. (tip below)
- I embossed the entire front of the oval with clear embossing powder. Did I mention that already? Good – because I repeated that step 5 more times after this one.
- Once the entire image was embossed 6 or 7 times, I put it in the freezer for about 5 minutes.
- While the freezer was open, I grabbed a Klondike bar. What would you do for a Klondike bar?
- When I pulled the image out of the freezer, I bent it a couple of times in different places. It created cracks along the front of the image.
- To accentuate the cracks, I brushed the image with Early Espresso ink and wiped it off with a Stampin’ Up! paper towel.
Here’s a close-up of the Cracked Glass final image: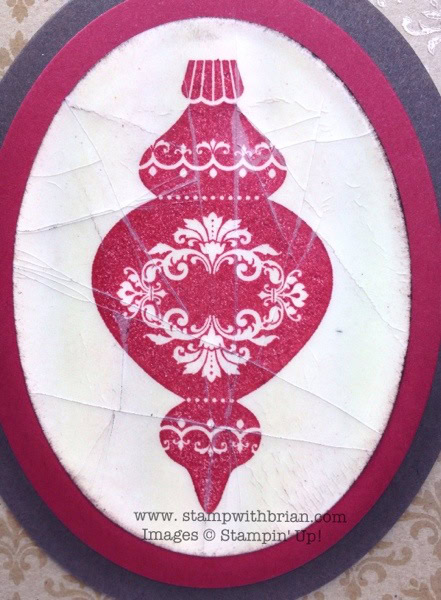
Tip for Embossing a Large Surface: On the back side of the image, I created a little loop of temporary tape (I use Post It tape). Part of the tape is stuck to the back, while the other is folded over to create a little handle so I can hold the image while it’s embossed.
Stamp sets: Ornament Keepsakes Inks: Cherry Cobbler, Early Espresso Papers: Early Espresso, Cherry Cobbler, Very Vanilla, Natural Compositions Designer Series Paper Accessories: Ovals Collection Framelits, Clear Embossing Powder, Stampin’ Dimensionals.
Thanks for stopping by my blog today!
Brian

Wait! What? Did you not realize this stamp is still available? It’s one of the carryover sets from last year’s Holiday Catalog. To see a collection of the sets still available, CLICK HERE.


Oh BK, You crack me up! that is a great technique .
gorgeous!!! and your commentary is HILARIOUS! great way to start the day!
Anne
Great card! Thanks for the Sunday morning smile!!
Oh Brian, you really crack me up!! (no pun intended) I think I’m going to try it but first, I must go and get me some Klondike bars, just to make sure I follow your directions to the letter. Fabulous card, so vintage and unique. Thank you for sharing it and for the laugh on an early Sunday morning.
I love your instructions on how to do the technique! Are the Klondike bars an important step?! LOL! I would think so! Lovely card and fun technique! 🙂
Nice card, can you send me some SU paper towels? I want to get it right!
Thank-you! I love a good revival! And grabbing the Klondike bar is actually caring for the planet and reducing your carbon footprint since the freezer was already open. Good on you, mate!
Sounds like you’ve been inhaling the fumes from the embossing powder. LOL Great card, BTW. Sharon
Even though you showed a close up of this creation I think I would appreciate it`s beauty if you just sent me one !! I haven`t done Cracked Glass in a long time but, it is a fun and rewarding technique . You really did it good ! I like that you used it in an oval lending a little Vintage to your Christmas card . BTW….Patti Willey is showing one of your cards along with Maria`s on her blog this morning ! Go take a look ….we are talking about you again !
Love this Brian! I have always wanted to try this technique but I’ve never seen it done with clear embossing powder, what a great idea. I will absolutely give it a try and I would love to see some of your “previous life” creations, especially those necklace charms. Great tip about the “handle” for embossing, too.
Wow! I am amazed at your creativity…..I’m moving to Georgia!! So much to learn!! Thank you for sharing. You’re a genius!!
Hey, Brian, you may have started a revival of this technique! I’d forgotten about it! And your hints are spot on! Beautiful card — what do you get when you cross an accountant (with his attention to detail), with a creative stand up comedian? Brian (the blog) King!
Funniest blog and replies ever today!
Rumor has it that the SU paper towels are in the next catty….LOL.
Stampin up paper towel!?!? Made me laugh:-)
I was thinking something is different when todays blog started out with “the facts” …Where was the usual Brian story that gets me laughing in the morning??? Needless to say I was reading away and totally caught off guard when I got to the Klondike bar. You NEVER diappoint with your engaging posts, your humor, or your amazing talent!!! Beautiful card. And all is right with the world now that I have had my morning belly laugh!
Very nice card and technique. I’m wondering . . . I just purchased a bottle of crystal effects. I’ve read this makes things shinny. Would this work? I guess it would take a long time to dry. Thanks a bunch for the hints and technique. 🙂
Love the antique look Brian! Especially LOVE the Stampin’ Up! paper towels!!! You are too funny.
Were the SU paper towels carried over with the ornaments? You did not list them in your materials! I hope SU does not discontinue paper towels! How are you thinking about recycling the Klondike paper for your next project? I love the card. I haven’t used this technique in a bunch of Sundays. Thanks for the instructions. You are great! (Don’t let all these comments go to your head.) Nancy B
Neat technique It reminds me of what my iPad and my daughter’s iPhone look like when dropped on the cement ground…….
Too funny!
Cheers with you & your Klondike!! Thank you for helping me roar with laughter today!! This creative card is wrinkled in all the right places… wish I was!! Har-dee-had-HAR!! 😉 I do love your use of the Natural Composition DSP, BTW!!!
Love the card, but what is a Klondike Bar? Don’t have them in Australia.
Ha! A Klondike Bar is an ice cream bar covered in chocolate. They are square and come in a silver wrapper. The ads (really big in the ’80’s) said “What would you do for a Klondike Bar” and featured people doing really odd things to get one. 🙂
Your Awesome! I love reading your post everyday, they are so up beat! Thank you!
Brian, this is such a beautiful technique. I can’t wait to try it myself. I might just swap out an ice cream sandwich for the Klondike bar though. . .
Oh, oh, a new technique to try. Very cool.
Beautiful. You are too funny. Helps to brighten the day (and wake me up in the middle of the day like right now). Will try this technique for sure as soon as I find some Klondike bar (maybe not in Canada?1?) and I have received my Stampin’Up paper towels….. had to write to DS directly as the OEX would not take my item…. go figure! Have a wonderful day. Now I am awake and can go back to work.