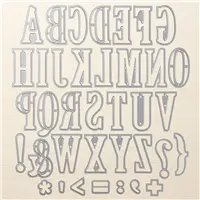
Eclipse cards have been all the rage recently – and for good reason. They are gorgeous! These cards feature and gorgeous printed paper and large dies (mostly commonly the Large Letter Framelits Dies, which are amazing). I’ll explain how the cards work after I share this card that I made with my local stamp club. Here’s my card:
- Eclipse Technique. How fun is this technique?! There are so many ways to make this technique shine – this is just one of them. Here’s a quick-and-dirty explanation of how this technique works:
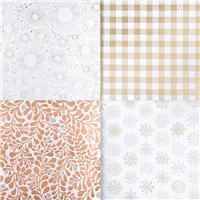
- Start with a piece of printed paper. You can use a Designer Series Paper (that’s already printed for you) or you can create your own pattern with stamps and ink. I used the Year of Cheer Specialty Designer Series Paper. The thicker the paper, the better – you’ll see why in a moment.
- Line up the letters you want to spell on the cardstock and roll them through the Big Shot. I’m not pressuring you, but clean cutting plates and a Magnetic Platform will make things so much easier for you. You’re welcome.
- Glue the card panel to another piece of paper or to the base of your card to create a different color behind the cutout letters.
- Carefully remove the paper from the dies (and keep the “inside” pieces like the center of the “O” above).
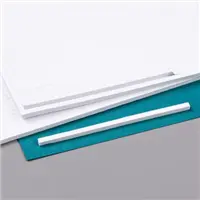
- Apply Foam Adhesive Strips to the back of the letters you want to pop up. These are long, slender strips that were introduced in this year’s Annual Catalog (page 203) that are perfect for shaker and spinner cards – and Eclipse cards. 🙂 Sure…you could use the “leftovers” from your Stampin’ Dimensionals, but these are so much easier to work with and give your project great lift.
- Add the letters back to the card front (glue down the centers of letters like “O” and “A” to give continuity of the letters.
- Embellish and adorn your card.
- Smile – because you made that!
- Year of Cheer. Year of Cheer Specialty Designer Series Paper is a perfect choice for this fun technique. Not only is the paper GORGEOUS, but the pages are thick (which is perfect for this technique). You also get 3 each of 4 gorgeous, metallic designs in this pack of papers – take a look:
 Here’s a closeup of the card I made to showcase how gorgeous and shiny this snowflake print is:
- Christmas Colors. I adore non-traditional colors at Christmas. Blues have become SO popular that I almost consider them traditional colors now. Still, I love them. This combination of Soft Sky and (a touch of ) Night of Navy really looks great together – the addition of gold really makes it special. If you like this combination of colors, too, please save this:

Papers: Year of Cheer Specialty Designer Series Paper, Gold Foil, Soft Sky, Night of Navy Accessories: Large Letters Framelits Dies, Foam Adhesive Strips, Magnetic Platform
Thanks for stopping by today!
Brian
One-for-One Card Swap. The cards are pouring in for my 2017 Holiday One-for-One Swap. I love opening up the mailbox each day to see what you’ve created – but the deadline is soon approaching, so please get your card in the mail to me soon. For information about the swap and how you can participate, please click here or on the picture below:
Designer Series Paper Sale. Who doesn’t love a Buy 3, Get 1 free promotion? You don’t want to miss Stampin’ Up!’s sale – going on until the end of October! What fun! Click this banner to see all the papers that are a part of this special:


Beautiful, Brian!
Thank you so much, Suzie! I’m glad you like it! <3
A beautiful card Brian
🙂 Thanks, MargaretAnn. My club members really had fun making it, too.
Brian,
Will this hold up in the mail? What should I use to keep it from being smashed? Also, when using the adhesive strips, do you cover every surface of the letter or just make one or two lines on the straight sides?
Thanks for your amazing posts and ideas!
Thanks for your comments and questions, Maxine! I added pieces along the bolder lines of the letters, so not all parts of the letters are covered. This is a thick cardstock, so it should hold up OK to go through the mail. If I were to mail it, I’d put it in a clear envelope and tuck it in a bubble mailer just to make sure it arrives safely. If I’m going to put this much into a card, I want to make sure it’s received in flawless shape. 🙂
Your explanations of special tips on how you prepare your creations crack me up…and so many times, make for a big smiler starter in my day. Thanks for sharing all you do! Please don’t stop?
Thanks, Tina! I try to have fun while I’m writing my posts so that the fun translates. So glad it does! 🙂
And of course I’ve never thought of using either – the patterned paper or the foam strips! You’re a genius! Can I get your autograph in a few weeks?
This is beautiful!
I would give you anything – you just have to compliment me and then ask for it. 🙂 Thanks for your comments, Lydia! <3
I adore blue for Christmas along with this tip (brilliant, BK).
I’m not pressuring you, but clean cutting plates and a Magnetic Platform will make things so much easier for you. You’re welcome.
Tee hee. I laughed while reading my very own comment. It sounds funnier when I hear your voice saying it, Mary. Thanks for your comments! <3
Very pretty.
Thanks so much, Liz. I appreciate it!
Gorgeous, gorgeous, gorgeous (can you tell I like it?) card. This eclipse technique is so popular right now and I’m surprised the card companies haven’t picked up on it yet. I agree that the foam strips are wonderful to work with as they can be bent to fit circles, etc. I especially like them for shaker cards. I love that you put the gold foil paper behind the DSP. It really showcases the cropped letters. Perfect Mr.King, Just Perfect!
Perfect?! Really?! 🙂 Thanks so much, Grace! It’s a fun technique – it made this paper really special for me. So glad you like it.
Love your card Brian – and all of your tips! So fun to have coffee with you every morning!
Thanks so much, Pam! I love sharing, so I’m glad you love what I’m putting out there. I enjoy our daily coffee, too. <3
I am beginning to think great minds work together. Eclipse cards have been high on my list (see my Facebook page). I did one for FALL and one for WINE and today was JOY – so thanks for the great idea. So much fun and such a great presentation. Your is wonderful, as usual.
All such great ideas with this technique, Roxanne! Thanks so much for your comments. <3
I loved making this card at our club meeting. Very fancy!
It was fun, wasn’t it? I’m so glad y’all enjoyed it! <3
Brian, I absolutely love your humor! I appreciate you for letting the fun shine through your conversation. Love the DSP you used for this fun technique.
🙂 Thanks so much, Katrina! I have fun creating my cards and writing my posts – is there another way to do them?! 🙂 I’m so glad you like it and am happy to share with you every day.
Super gorgeous card Brian, but how could it not be? The Year of Cheer suite dsp takes everything up a notch. I love that you chose the gold rather than the champagne, it makes the gold in the dsp really pop. Awesome job Brian a real stunner.
Thanks so much, Robbye! I really appreciate your feedback! When I was done, I did think that I should have used the Champagne to showcase that beautiful, new paper. I’m glad you like my choice. <3
Love the big letters ,but I would like to try shapes (since I do not have those GIANT letters) just for fun . I think this is a neat project that could be addictive !!
Really pretty !!
Thanks so much, Sonny! This would be just as cool with shapes – especially if they are long and thin (and in the shapes of letter). 🙂 You’ll have fun with it, I know.
I love this……sooooo beautiful! Why don’t I have these letter dies?
How can you NOT have the dies, Linda!? Put that on your next list, please. So glad you like it! <3
Love seeing more great ideas for using the Large Letters Dies. So glad I bought them. this card is on my CASE list! Love it
Yay! They are a wonderful investment – I’m so glad I have them, too. Thanks, Dianne!
Pingback: Thanksgiving Dinner Place Cards for GDP111 – STAMP WITH BRIAN