


It’s time for another Be Inspired Design Team Blog Hop – what fun! The Be Inspired Design Team is a group of Stampin’ Up! demonstrators from all over the world who are excited to share our themed projects with you. I’m so honored to be a part of this group of talented stampers!
 The theme for today’s Be Inspired Hop is “New Life.” Projects along the hop are related to either Spring or big life events (like the birth of a baby or celebration of a marriage). If you aren’t starting the hop here, then you probably just popped over from the amazing project shared by my talented Canadian friend Carolynn Sander.
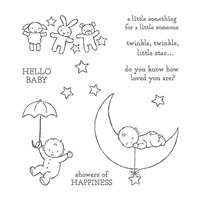
I used the stuffed bunny from Sweet Little Something to make an adorable baby card. What better way to welcome a sweet baby than with a sweet card?! Here’s my project:
 Tips, Tricks and Reminders
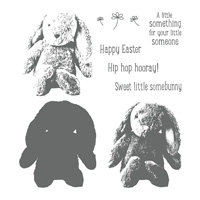
- Sweet Little Something. Stampin’ Up!’s three-step stamping sets have really taken on new life. There are cupcakes, teddy bears, a flamingo – and this plush bunny. When stamped with the right colors, this bunny almost looks like a photograph. The images are stamped with a progression of colors or shades. The image with the most surface coverage and is inked with the lightest color, and the image with the least surface coverage (and most detail) is inked with the darkest color. Together, they are perfect! Here’s a look at this adorable set:

Sweet Little Something, Stampin’ Up!
While it’s a perfectly appropriate stamp set for Easter, it’s just as wonderful for cards that celebrate babies or birthdays – or to celebrate the birthday of your favorite baby bunny.
- Building Bunny. There are two approaches for building two-step or three-step images. Some suggest that you build from the most detailed to the least detailed, while others suggest that you build from the least detailed to the most detailed. Either one works – I’ve tried – but I find it easiest to stamp the least detailed image first (the lighter color) and build on that.
 To build my bunny, I stamped the the least detailed image (the solid outline) with Sahara Sand. I then inked up the middle image (the one next to the solid image in the product photo above) with Crumb Cake and lined it up with the feet. Last I inked up the most detailed image with Early Espresso and stamped it over the other two layers. I love the shading on this bunny! Here’s a look at the three colors I used to build my bunny:
- Sweet Color Combination. All of those browns are beautiful, but they don’t really make a baby card until you add pink or blue or yellow or green or… Lucky for you, all of those colors look great with browns. Win! I paired my brown bunny with a Soft Sky background for a sweet look. If you like this combination of Soft Sky, Crumb Cake and Early Espresso, please save this:


Stamp Sets: Sweet Little Something, Moon Baby Papers: Crumb Cake, Early Espresso, Soft Sky, Whisper White Inks: Sahara Sand, Crumb Cake, Early Espresso Accessories: Sliding Door Framelits Dies, Stampin’ Dimensionals
 I’m so glad you stopped by and hope you like my project. I also hope you’ll continue the Be Inspired Design Team Blog Hop to see more projects that I’m sure you’ll love. The next stop is my another Canadian friend, Cathy Caines at In the Cat Cave . Click on the banner below to continue through the hop:
 Thanks for stopping by today!
Brian

In case you get off-track at any point during the hop, here’s a listing of all the participants in this hop:
- Louise Sharp
- Janneke de Jong
- Jenny Hall
- Tanja Kolar
- Monica Gale
- Maike Beimler
- Carolynn Sander
- Brian King
- Cathy Caines
Here are links to the products I used to create this card:


This is a beautiful card.
Thanks so much, Margaret Ann! I’m glad you like it. <3
What a sweet card. I do love those layered, photographic like images!
They are fun, aren’t they!? Thanks, Dianne! <3
Such a beautiful bunny and the soft blue is the perfect contrast to the neutrals.
Thanks so much, Mary! I’m so happy you like it. <3
I like your layout and soft colors!
Thanks, Windy! It was a fun set to play with. <3
Such a cute card. The bunny is always perfect to welcome a new baby to our world. Great job.
Hugs Tanja
Thanks so much, Tanja! I’m so happy to hop with you. I’m glad you like this project. <3
Adorbs!
<3 Thanks!
This is such a sweet card, Brian. Great color combo for the adorable bunny. The sentiment is special. Enjoy your day!
Thanks, HJ! I was really happy with how the bunny turned out. Glad you like it. <3
Thanks Brian for “giving permission” to layer in either direction.
I thought we always had to start lightest least detailed. Maybe I’ll find it easier now!
I agree with your way of thinking – I got a better result by building from the lightest. It’s always fun to try new things, though. 🙂
It’s BunnyTime! And this one is adorable…..cute and cuddly!
Thanks, Linda! I am happy with how this bunny turned out – I couldn’t have guessed he’d be this cute. 🙂 Thanks!
Cute card! Brian I also use the less detailed stamp first with the lightest color, however; now I will be doing my 3 steps stamping on the Stamparatus with ease. ?
Thanks, Katrina! I’m so glad you like it – it’s SO MUCH EASIER with a positioning tool! <3
There’s some great stamping in this project, Brian. Well done! Love this project.
Thanks so much, Jenny! This was a fun hop! <3
Those are the colors that I’m doing my bedroom :).
Beautiful! Thanks for your comment, Elizabeth.
Ohh!! this image is just adorable and so sweet, the bunny looks so real, with all of that amazing texture and dimension.
A must have stamp for your baby card making.
Thank you for sharing.
XO
Thanks, Maria! I’m so happy you like it. I couldn’t be happier with how lifelike the bunny appears. <3 Always love to hear from you.
What an adorable card Brian! And I love the tips on stamping with the least detailed image 1st! I also love how you placed/cropped th bunny! You are too awesome! Hugs from Canada! ?
Thanks so much, my friend! It was a fun hop. <3
What an amazing card Brian, love the bunny colors too …
Thanks, Janneke! <3 I'm so glad you like it. What a great hop!
Love….I have this stamp and have failed at achieving this huggable bunny. Going to take it out again and stamp using your method. Thanks Brian. Happy Easter.
Thanks so much, Lin! I hope it helps to layer differently. It also helps to have a stamp positioner (like MISTI or Stamparatus) to make sure the images line up perfectly.